Due to a sudden burst in spammer activity, account creation has been temporarily disabled. Sorry for the inconvenience to any new potential contributors.
WIA Manual
From AGEWiki
Installation
Installation Procedure
Using a CD-ROM/DVD
- Start your computer and insert the CD labeled WIA into your CD-ROM or DVD drive. The setup program will start automatically. Follow the on-screen instructions to install the game.
- If Autoplay is not activated, start the setup program by double clicking on My Computer, then on the icon of your CD-ROM drive and finally on “setup.exe”.
- If Microsoft (R) DirectX 9.0c (R) is not present on your PC, please launch the DirectX installer, which can be found on the CD-ROM.
- Once the game has been installed, you can start it from the Windows Start menu, the desktop shortcut or if Autoplay is enabled, by inserting the CD. Note that the CD is not required to play the game.
Using Digital Download
- Download the game as instructed in your Purchase Email.
- Start the setup program by double clicking on My Computer, then on the icon of your download folder and finally on the file you saved during download.
- Once the game has been installed, you can start it from the Windows Start menu or the desktop shortcut.
Patches
Update your game by downloading the latest patch from http://www.ageod-forum.com/forumdisplay.php?f=199
Removing the game: select “add/remove programs” in the Control Panel. Select WIA. Click “add/remove”.
This will uninstall WIA, including saved games.
System Requirements
Minimum Requirements
- Processor: Intel Pentium or AMD, 1500 MHz
- RAM: 1024 MB
- Graphic Card: 128 MB vRAM, DirectX 9.0c compatible
- Sound Card: 16-bit, DirectX 9.0c compatible (DirectMusic compliant)
- CD Rom: x 8
- Peripherals: Microsoft compatible keyboard and mouse
- Operating System: Windows XP, Vista
- Hard Disk: 2000 MB free disk space
- DirectX: Version 9.0c
Recommended Requirements
- Processor: Intel Pentium IV or AMD Athlon, 2000 MHz
- RAM: 1024 MB (2048 MB of RAM for Vista)
- Graphic Card: 128 MB vRAM, DirectX 9.0c compatible 256 Mb
- Sound Card: 16-bit, DirectX 9.0c compatible (DirectMusic compliant)
- CD Rom: x 8
- Peripherals: Microsoft compatible keyboard and mouse
- Operating System: Windows XP, Vista
- Hard Disk: 2000 MB free disk space
- DirectX: Version 9.0c
The Main Menu
The Main Menu Screen allows players to access basic game functions such as loading saved games, starting new games, viewing a movie-like replay of the last turn and setting game options.
Options
Game options are divided into various sub-groups.
Media
The Media sub-group contains options pertaining to the way in which game audio is configured and graphics are displayed. Other game settings in the Media sub-group let players set tool-tip delays, pauses after battles, and combat animations.
Game
The Game sub-group contains options allowing players to activate/deactivate the Fog of War, set Attrition conditions and intensity, use of randomized Leaders, and more. The default settings are recommended, especially for players that are new to the game system used in WIA.
AI (Artificial Intelligence)
The AI sub-group contains options allowing players to set individual parameters of the game’s AI. Players can make the AI very powerful and thus present themselves with greater challenges.
System
The System sub-group contains options allowing players to adjust technical settings. These include ‘Texture Init.’ and ‘Region pre-caching’—options that allow for smoother scrolling. The default settings are recommended for most systems. However, the AGEOD forum can help you determine which settings are best for your computer system.
See
 http://www.ageod-forum.com/showthread.php?t=8434
 http://www.ageod-forum.com/showthread.php?t=13445
Campaigns and Scenarios
When starting a new game, players are presented with a list of available scenario. These range from relatively short scenarios to full campaign games. Short scenarios are limited in scope and involve less territory on the game map. Full campaign games, like the Campaign 1775-1783, involve entire theaters of play and literally hundreds of individual Leaders and units. (A campaign game that lets players fight years of North American warfare on a scale which takes into account Company and Battalion-sized strength points is bound to take considerable time and effort.)
The list of scenarios also includes a Tutorial exercise that is HIGHLY recommended for new players. The game mechanics of Wars in America are relatively simply to learn, but don’t be deceived—the game system is incredibly complex and nuanced behind the scenes. Learning to master the subtleties requires patience and practice.
The tool-tip feature gives brief descriptions of each of the scenarios. Once players have made a scenario selection, starting the game merely requires choosing a side (example: FRA or GBR).
Loading, Deleting, and Renaming Games
Instead of starting a new game, players may ‘Resume’ a previously-saved or automatically-saved game. Players also have the option to Rename, Delete, or Restore a previous turn as indicated by the tool-tip. Holding the mouse over the game in the Load Game window provides players with short-cuts to these file-handling options. (It is not advised to rename a saved game outside of WIA.)
Saving Games
Games are saved automatically by the game system upon completion of a game turn. Usually, the only time a player needs to manually save a game is when they Quit in the middle of plotting movement for an up-coming game turn and want to resume issuing orders upon restarting the game. Players may save a game at any time by pressing the Esc key and accessing the Main Menu. From here, players can select the Save Game menu.
Note: Players also have the option of restoring any of the previous 24 turns of a Saved game. Note that all saved turns of a game which are more recent than the one restored are lost once this ‘older’ turn of that game is actually restored.
Play By Email (PBEM)
WIA can be played against another human opponent using PBEM or any other valid file transfer protocol, such as Instant Messaging. One of the players (the “Host”) will have to initiate the game. The procedure is detailed as follows:
Step1: Create a game
The Hosting player chooses a Campaign/Scenario and a side and starts the game as usual. This automatically generates a sub-folder in the C:\Program Files\AGEODs Wars in America\WIA\Saves\ directory, named after the Campaign or Scenario selected (1775 Campaign if you play the ‘1775 Campaign’ scenario, for example). Please note that a number helps differentiate between multiple instances of the same Campaign/Scenario. However, the best way to avoid confusion is to rename the in-game Save (e.g. 1775 Campaign John vs. Joe). Do NOT rename any WIA files externally to the game.
In this newly created folder you will find two TRN files, each with three letters indicating which side it belongs to (example: FRA or GBR).
Note: C:\Program Files\AGEODs... is the default directory. This directory may be titled something different if the game is installed to another location. It is also different for the different language versions of Windows.
Step 2: Host Sends TRN file to Opponent
The Hosting player sends his opponent the TRN file with the opponent’s designation (i.e. if you play the FRA, then send the COL file to your opponent). The opponent must store this file in the folder named WIAGame\WIA\Saves\. It is advisable to use subfolders to keep all PBEM games in progress separate. For example, the opponent could save the TRN file under the WIAGame\WIA\Saves\JohnVsJoe subfolder.
Note: In order to avoid possible data corruption during the file E-mail transfer process, it is strongly advised to E-Mail the file using the Zip file and password options included.
Step 3: Non-Host sends ORD file to Host
Non-Hosting player now loads the game and gives his orders for the upcoming turn. When ready, the Non-Hosting player saves the game. This will generate an ORD file (in the folders mentioned above).
Important: The Non-Hosting player should NOT click on End Turn button at this step. The Non-Hosting player now sends his ORD file to the Hosting player.
Step 4: Host Resolves Turn
The Hosting player saves the ORD file received from his opponent into the appropriate directory and loads the game again. He now clicks on End Turn button to launch the turn resolution, where all orders are then executed.
A new turn is now ready to start. Go back to step # 2 and repeat.
Note: The Non-Hosting player now has the opportunity to “play back” his opponent’s turn using the new 'Playback' feature.
Replay
Selecting Replay allows the player to view a 'movie-like' replay of the last turn execution. The controls are similar to an MP3 player: Forward, Reverse, Stop, Start, etc. A day-by-day stepwise button is also available.
Winning the Game (Overview)
Victory in Wars in America is determined at the conclusion of each scenario by comparing Victory Point totals. The side (ex: FRA or GBR) with the most Victory Points (VP) is declared the winner. Relative differences between Victory Point totals can be used as a measure of how well a player performed in comparison to his opponent. Scenarios can be brought to an immediate conclusion if conditions for Automatic Victory or Automatic Defeat are met. A scenario can also immediately end if conditions for Sudden Death are met.
Victory Points (VP)
Victory Points are earned and accrued each turn for such things as holding important locations on the map, achieving goals as set forth by individual scenarios, and by destroying enemy units. A running total of a player’s current Victory Points is displayed in the top left corner of the Main Screen.
Once earned, Victory Points are never lost except in cases where a player has decided to promote a Leader outside the normal Seniority hierarchy (i.e. players do not lose VPs if their own units are destroyed or if they lose control of designated Objectives).
| Victory Point Modifiers | Number of VPs Earned/Lost |
|---|---|
| Strategic City | +1 VP per turn |
| Objective City | +1 to 3 VPs per turn (according to scenario) |
| Enemy Unit Destroyed | (+ VPs) Variable according to unit |
| Leader Promotions which Bypass Seniority | (− VPs) Variable according to BYPASSED Leader’s Political Cost |
Important Note: In order to gain credit for a captured Objective or Strategic city, a player must garrison the
location with a regular unit (i.e. no Irregulars, Militias) if the region has a Loyalty Rating less than 51%.
Scenario Objectives
Each scenario in Wars in America has a specific list of Objectives representing important cities and goals that players attempt to own or achieve throughout the course of play. These Objectives are listed in the introductory summary before the start of each scenario and on the Objectives Screen (F5 key) during play.
Objective Cities
Players start scenarios with one or more Objective cities already in their possession; the rest must be taken from the enemy before the scenario’s end. On the Objectives Screen (F5 key), each Objective city is listed along with its value in National Morale points. National Morale Points gained or lost as a result of Objective cities changing hands is only calculated once—at the end of the turn. In other words, gaining NM points for capturing a city is a one-shot deal; you don’t get NM for the city every turn (unlike Victory Points, which are earned each turn).
| NM value of Objective City | VPs Received Each Turn |
|---|---|
| 1 or 2 National Morale Points | 1 VPs |
| 3 or 4 National Morale Points | 2 VPs |
| 5+ National Morale Points | 3 VPs |
Sudden Death
Sudden Death refers to winning the scenario by owning or capturing a certain number of Objective Cities. Some scenarios may be ended early if a player reaches the required number of cities. This type of victory should be considered a Major Victory. Not all scenarios have Sudden Death conditions. If a scenario has Sudden Death conditions, these conditions will be listed in the scenario summary along with the number of cities required to trigger Sudden Death.
National Morale (NM)
National Morale is used to represent the willingness of a civilian population (and its military forces) to ‘continue the fight’. Having a high National Morale total indicates that a populace is more inclined to support the war effort; a low National Morale total is an indication that the people are close to giving up. In game terms, a high National Morale may trigger an Automatic Victory while conversely a low National Morale may trigger an Automatic Defeat. National Morale is also used to modify unit cohesion, the production of supplies, and the accumulation of money. Winning a scenario by reaching the Automatic Victory threshold should be viewed as a Major Victory whereas winning by virtue of having more Victory Points is a Minor Victory.
Calculating National Morale
Each side (e.g. FRA or GBR) is given a National Morale total at the start of each scenario. As with Victory Points, National Morale is calculated each turn and a running total is displayed in the top left corner of the Main Screen. Unlike Victory Points, however, a player’s National Morale total can be (and often is) reduced by events that occur during a turn.
| National Morale modifiers | Effect on NM |
|---|---|
| Capture of Objective regions/cities | Increases NM according to value set by scenario |
| Loss of Objective regions/cities | Reduces NM according to value set by scenario |
| Winning a Battle | Increases NM according to # of enemy units destroyed |
| Losing a Battle | Reduces NM according to # of friendly units lost |
| Losing Leaders (Casualties or Loss of Seniority) | Reduces NM according to Leader’s Political Cost |
| Leader Promotions which bypass Seniority | Reduces NM according to BYPASSED Leader’s Political Cost |
National Morale and Unit Cohesion
National Morale affects unit cohesion (reflecting the fact that military forces with high morale are generally more combat-efficient). A high National Morale also increases the speed at which Cohesion is recovered. For every two NM above 100, a unit’s maximum cohesion total is increased by 1%. For every two NM below 100, a unit’s maximum cohesion total is reduced by 1%.
National Morale and Supply Production
National Morale affects the amount of supplies produced by supply sources. For every two NM above 100, the amount of supplies produced by a supply source is increased by 1%. For every two NM below 100, the amount of supplies produced by a supply source is reduced by 1%.
For example: A side which has a National Morale of 80 (i.e. 20 points less than 100) would experience a 10% reduction in unit cohesion. In addition, the overall number of replacement troops available would also be reduced by 10%. Supply sources would produce 10% fewer supply points.
Automatic Victory/ Defeat
Automatic Victory is achieved when a side reaches objectives indicated by the scenario . This information is indicated on the Objectives Screen (F5 key) of the Ledger and as a tool-tip on the scenario selection menu.
A scenario immediately ends if either side (USA|FRA or GBR) possesses all objectives defined in that scenario, PLUS at least 50% of that scenario’s strategic cities (note that the number of strategic cities depends on the scenario) An Automatic Victory is considered a Major Victory; conversely an Automatic Defeat is considered a Major Defeat.
For example: At the start of the 1775 Campaign objectives cities for Continental player are: Quebec, Montreal, Detroit, Boston, New York, Philadelphia, Richmond, Pittsburgh, Charleston and Wilmington. In addition there is twenty four strategic cities, so for an automatic victory he must own all the objectives and at least twelve strategic cities.
Main Screen and Game Interface
The majority of your gaming experience in Wars in America will take place while viewing the Main Screen and satellite displays (i.e. Unit Panel, Unit Detail Panel, etc.). The game map can be scrolled by moving the mouse to the edges of the field of view or by using the Arrow keys. The map view may also be ‘Zoomed’ (In or Out) by using the mouse-wheel or by pressing the End, Page Up and Page Down keys. Press the mouse-wheel button down to toggle between the extreme Zoom magnifications.
Tour of Main Screen
The Main Screen below (Figure 4.1) shows the initial game turn of the 1812 Campaign. For illustrative purposes, the Fog of War option has been turned off.
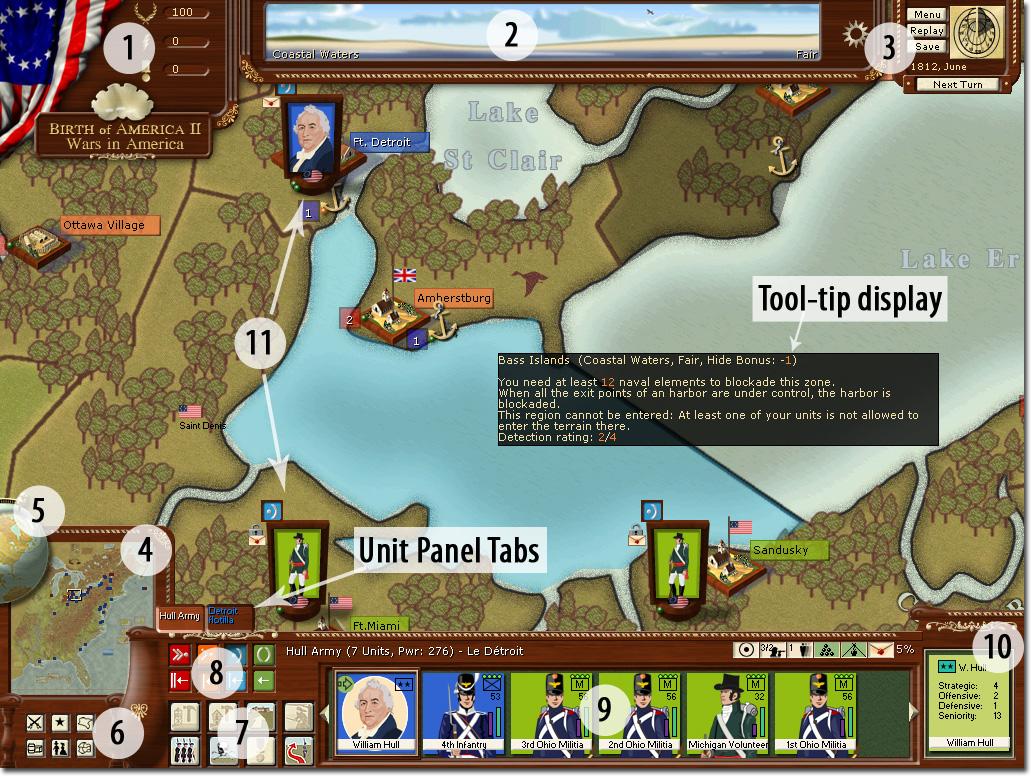
The Main Screen
Refer to Figure 4.1 regarding the following numbered items of interest.
- Player Summary Display: This display keeps a running total of a player’s accumulated Engagement Points, National Morale, and Foreign Help points (if applicable according to the scenario being played).
- Terrain and Weather Panel: This panel gives players a visual indication of the terrain and weather located in the region of the game map where their mouse is currently positioned.
- Main Commands Panel: This panel contains three (3) buttons that grant access to the Main Menu, Save Game procedure, and End Turn (used to initiate computer resolution of plotted activity). The current game date is also located here. A tooltip informs players of the turns remaining in the scenario being played.
- Mini Map Display: The mini-map depicts a map of North America and contains a jump feature allowing players to left-click and view any location on the map (allowable according to scenario).
- Globe: Left-clicking on the Globe opens the Ledger. Pressing the Esc key closes the Ledger.
- Map Filters: Left-clicking on these toggle buttons allows players to filter the map. Use the tool-tip to determine each filter and its function. Numeric keys on the keyboard also correspond to various filter functions.
- Special Orders Panel: This panel contains Special Orders buttons. A grayed-out or subdued button indicates that a particular Special Order is either not applicable or unavailable.
- Postures and ROE Buttons: The top row of buttons allows players to set their desired Command Postures. The bottom row of buttons allows players to set Rules of Engagement.
- Unit Panel: The Unit Panel displays the details and composition of the currently selected Force. The individual unit images appearing on the Unit Panel are referred to as ‘unit counters’. During a game turn, the Unit Panel is replaced by a Message Log. The Message Log is also displayed if no Force is selected.
- Elements Panel: The Elements panel contains a graphic representation of all elements belonging to a selected unit. Left-clicking on an Element icon gives players access to the Unit Detail panel for that element.
- Troop Display Marker (TDM): Forces outside of structures are represented on the game map by their TDMs. A TDM contains a portrait of the Force’s Leader, a color-coded background indicating nationality, an icon indicating the side to which the Force belongs, a series of bullets representing the size of the selected Force, and a number indicating the number of additional Forces in the region.
The Message Log
Left-clicking the End Turn button ends a player’s ability to issue orders for the up-coming game turn and initiates the game turn resolution segment. The Unit Panel is converted into a Message Log window as seen in Figure 4.2.

The Message Log contains a summary of events that took place during the game turn. Message Log text that is colored red indicates events of particular importance (events in red may be clicked to view a pop-up newspaper account).
The six toggle buttons to the left of the Message Log window act as message filters. Use these toggles to filter out unwanted messages or highlight messages concerning particular topics. Double-clicking on a message line in the log jumps the Main Screen to the section of map pertaining to that message.
Regions and Sea Zones
Land Forces and naval units move across the game map by tracing their movement paths into (and through) hundreds of land regions and sea zones. Holding the mouse over a region or sea zone creates a tool-tip display that provides players with information specific to the region or zone.
Regions are identified in part by their Civilization Level. The four (4) Civilizations levels are: Wild, Cleared, Developed, and Rich.
Forces have a limited ability to ‘live off the land’ (i.e. forage) depending upon the civilization level of a region. Regions that are considered Wild, for example, provide less forage than regions that are deemed Rich. Land forces may not enter Sea Zones except when being transported by naval vessels. Therefore, forage is not available in Sea Zones.
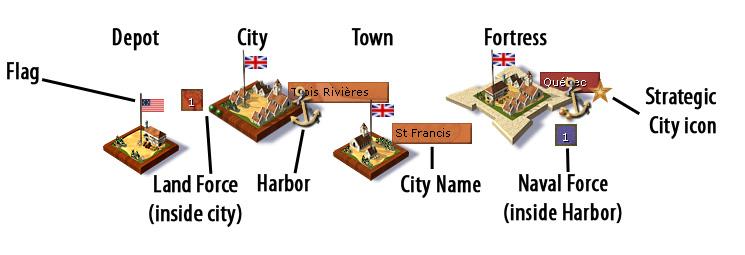
Structures
Cities, towns, fortifications, harbors, and depots are known collectively as ‘structures’. Their presence on the map is indicated by an icon which gives players a visual clue as to their size (i.e. level) and strength. One of a player’s main goals is to control Objective and Strategic cities in order to generate Victory Points or trigger an Automatic Victory per the scenario being played.
Cities
Certain cities are designated as Objectives or Strategic locations. All cities have their size indicated by a number appearing on their name plate. This number represents the Level of the city—from small cities (Level 1) to very large urban centers (Level 20). Cities act as supply sources according to their level. Cities larger than Level 6 automatically generate friendly garrisons if manpower of the appropriate type exists in the Replacement Pool. Cities may be captured by enemy forces, but they can never be destroyed.
Settlements
Settlements are very small European communities in the American wilderness. They act as a limited supply source (for very few units) and they can be captured, entered or destroyed by occupying enemy units, including Indians and irregulars.
Native Villages
Native Villages are the Native Americans’ equivalent of settlements. They work as settlement for supply purposes and can also be destroyed. In addition, in most scenarios where Indians are active, the warbands usually return automatically to their villages of origin every winter to take winter quarters. (They will remain locked inside the village for the duration of the winter months.)
Towns
A town is a small city (Levels 1 to 3). Towns are supply sources and have the capability to generate added supplies if a depot is built inside. Towns may be captured by enemy forces but they can never be destroyed.
Stockades
Stockades are small basic field fortifications to protect a handful of men against their enemies. They can be destroyed by all kind of enemies and cannot be used to build depots or forts.
Fortifications
A fortification represents a defensive network of improved positions that provides benefits to defending units. These structures have a limited ability to generate and distribute supplies. Like cities, fortifications are represented by Levels that indicate their strength. There are four fortification levels: Non-Existent (Level 0), Standard (Level 1), High (Level 2), and Exceptional (Level 3). Fortifications interfere with enemy movement and supply transiting the region where they are located. Fortifications may be captured by enemy forces but only those of level 1 can be destroyed.
Harbors
A Harbor is a structure that has the benefit of being able to accommodate naval vessels. Naval vessels in a harbor are indicated by a figure next to the anchor icon representing the harbor. While inside a harbor, naval vessels may not be attacked by enemy naval vessels. Harbors provide supply to both land and naval forces unless they are blockaded by enemy naval vessels. Naval vessels can be ‘repaired’ (regain cohesion and reduce damage) while inside a harbor.
Depots
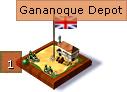
Depots are supply structures that are either represented on the game map at the start of a scenario or constructed by a player during play. For complete information regarding depots, refer to the Supply section of this manual.
All structures provide ‘shelter’ from attrition. Players may move a Force ‘inside’ structures by drag-drop(ing) the selected Force on the structure. Once inside, the Force is no longer represented on the game map by a TDM but rather as a number on a red blinking plate. To select a Force that has entered a structure, left-click on the structure.
Commander’s Note: Forces regain cohesion faster if they are placed inside of a structure as opposed to
just being in a region with a structure.

In terms of being protected from attrition, however, it makes no difference whether a Force is physically
inside a structure; being in a region with a structure is enough. A Force that is inside a structure may only
be attacked through Siege combat.
Areas and Theaters
Areas are made up of geographically connected regions. Locally raised units (i.e. militia) have limited combat efficiency outside of their Areas. Theaters represent a collection of geographically connected Areas. Use the Map Filters listed in Map Filters to see the Areas/Theaters present in the scenario being played.
Map Filters
Located next to the Globe and just below the mini-map on the Main Screen are two rows of Map Filter toggles. These six (6) toggles give players the ability to visualize information on the game map.
- Military Control (1 key): This filter shows regional ownership (where players have already established Military Control).
- Supply (2 key): The filter shows the location of General Supply and Ammunition stockpiles as indicated by wooden crates and cannonballs icons respectively (with each icon equaling approximately 50 supply points). The regions highlighted in green indicate the extent of your supply network (i.e. regions through which supplies may currently pass).
- Objectives (3 key): This filter highlights Objective and Strategic cities that grant Victory Points to their owner.
- Loyalty (4 key): This filter highlights regions according to their level of Loyalty.
- Areas (5 key): This filter indicates the location and size of Areas on the map.
- Theaters (6 key): This filter indicates the location and size of Theaters on the map.
Game Interface
Game play revolves around activity that takes place on the Main Screen and its assorted display panels. The interface is designed to allow players to left-click on items to activate or select them. In addition, the tool-tip feature allows players to gain access to a wealth of information simply by holding the mouse over various aspects of the game. The tool-tip display is set to “instantaneous’ by default, but this setting may be changed on the Options Screen.
Pressing the Esc key on your keyboard allows you to close any window that is currently open. If you press the Esc key while viewing the Main Screen, you are returned to the Main Menu options screen.
Note: A list of keyboard short-cut keys is available in the Appendix section of this manual.
Army Outliner
Seen on the right edge of the Main Map display, this is a shortcut that will take you directly to your armies (3 Star Generals commanding a Stack) present on the map.
- You see the portrait of the Army commander (face), nationality (background color and shield) and name.
- The displayed images can be "collapsed" or "expanded" by clicking on the small star to the left of the leader's name.
Organizing Your Forces
Understanding the Unit Panel
The Unit Panel is a versatile tool for viewing, selecting, and organizing your Forces (Units, Leaders, Naval vessels, Forces, Corps, Supply Wagons, etc.). Left-clicking on Forces (including Leaders and garrisoned structures) on the game map causes a horizontal display window known as the Unit Panel to appear along the bottom edge of the screen.

The Unit Panel arranges and displays unit counters belonging to the Force you selected. Arrow buttons to the left and right of the Unit Panel allow you to scroll through the row of units counters making up the Force. Only one Force can be viewed at a time. If multiple Forces are present in the same location on the game map, these are displayed as ‘tabs’ along the top of the Unit Panel. These additional Forces can be viewed by left-clicking on their respective tabs.
Information specific to the Force you are viewing is displayed above the unit counters. This information includes:
- the name of the Force,
- the number of component units contained in the Force,
- the Combat Efficiency of the Force (PWR), a numerical representation of the relative power of the Force,
- icons that display tooltip information (General Supply and Ammunition levels, supply expenditures, detection and evasive *ratings, and penetration indicators),
- a white or brown envelope indicating Activation status,
- Movement and Combat penalties (flashing red %) due to insufficient Command ratings (if any).
Note: Hold down the Ctrl key to see how many men are in the Force currently being viewed on the Unit Panel.
Units
The term ‘unit’ refers to military formations that are represented by a single ‘counter’ and can be moved independently on the game map. Units can vary in size from regiments, artillery batteries, and even individual Leaders. Note that size and strength are two different concepts. It is possible to have a Regiment-sized unit (weakened by attrition or combat losses) be reduced in strength to less than a company.
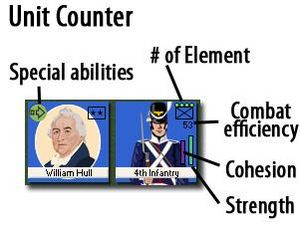
The Unit Counter
When displayed on the Unit Panel, a unit counter shows information specific to the unit. This information includes:
- the nationality of the unit (indicated by the counter’s background color),
- zone of origin (primarily displayed on militia units),
- Special Ability icons (small symbols in the top left corner),
- Unit type (shown by the NATO symbol in the top right corner),
- Unit experience
- Unit Cohesion (represented by the purple column),
- Unit Strength (represented by the green column).
Elements
Units have internal parts known as elements. An element is the smallest military formation in the game, usually representing a Battalion, Squadron, or Battery-sized formation. An element may also represent a multi-battalion regimental-sized formation. Elements cannot be further sub-divided. (Some units are so small that they contain only one element.) When an Element loses its last strength point, it is eliminated.
When a unit (or Force) is selected, its component elements are displayed in a window (known as the Element Display Panel) located to the right of the Unit Panel. The Command Rating (Strategic/Offensive/Defensive ratings) of the unit’s commanding officer (if any) is displayed across the top of the Element Display panel. The exact identity of each element (and identity of its parent unit) is displayed by holding the mouse over the element icon inside the Element Display panel.
Unit Detail panel
Left-click the element icon inside the Element Display panel to open the Unit Detail panel. The Unit Detail panel consists of three (3) vertically-arranged information panes.
The top pane displays:
- the element icon (NATO symbol representing unit-type),
- the element’s nationality,
- the element’s national symbol,
- the name of the element followed by the element’s position in the unit (2/8 indicates this is the second element out of a total of 8 elements in the unit),
- the element’s experience level (each star symbol indicates one level of experience ),
- the element’s strength (manpower symbols, each representing usually 100 men/ 10 men for artillery batteries),
- the unit type (i.e. infantry, cavalry, etc.) and actual number of men remaining/ the maximum number of men allowed. Note that many units start scenarios at less than their maximum allowable strength,
- Seniority and Political Cost (for Leaders).
The middle pane displays a variety of values, ratings, and modifiers that are used when the element moves, engages in combat, or is assessed by various game routines (i.e. supply, attrition, command, detection, etc.):

- Offensive Fire: This value is used by the element when it engages in offensive Fire combat. The higher the value, the greater the chance this element has of scoring a hit on enemy units.
- Defensive Fire: This value is used by the element when it engages in defensive Fire combat. The higher the value, the greater the chance this element has of scoring a hit on enemy units.
- Initiative: This value is used to determine whether the element will engage in Fire Combat before or after opposing units. The higher the value, the greater the chance that this element will fire before enemy units—thus inflicting casualties before suffering any in return.
- Range: This rating indicates the maximum range of the element’s principal weapons (i.e. rifle, musket, artillery, bayonet, etc.). A rating of zero indicates that an element’s principal weapon is used in Assault combat and requires physical contact with an enemy unit.
- Rate of Fire: This value indicates the number of times this element will fire its principal weapon per combat round. A high rate of fire gives an element multiple chances of scoring hits on enemy units per combat round.
- Protection: This value is an indication of an element’s ability to avoid suffering hits from enemy fire and melee combat. A high Protection value makes it more difficult to inflict casualties on an element. This value is determined by a number of factors such as speed, dispersion, flexibility, ability to use terrain, etc.
- Discipline: This value represents the element’s ability to retain its combat effectiveness. A high Discipline value indicates that an element can withstand greater punishment without Routing.
- Assault: This value is used by the element when it engages in Melee combat. The higher the value, the greater the chance this element has of scoring a hit on enemy units.
- Ranged Damage: These values indicate the number of strength points/cohesion points the element inflicts when it scores a hit on an enemy unit in Fire combat.
- Assault Damage: These values indicate the number of strength points/cohesion points the element inflicts when it scores a hit on an enemy unit in Assault combat.
- Cohesion: This value indicates an element’s current number of Cohesion points. Cohesion points are an expression of an element’s combat readiness and impact on most game functions (morale, speed, combat efficiency, etc.). The higher the value, the more able an element is to conduct military operations.
- Movement: This entry indicates the element’s Movement type. Movement types include Infantry (heavy and light), Cavalry (heavy and light), and Wheeled (normally used by supply wagons and artillery units). Note: Horse artillery units are classified as Heavy Cavalry.
- Speed Coefficient: This value represents a multiple used to calculate the speed of individual elements. The higher the co-efficient, the faster units are able to travel. For example, a heavy infantry unit needing three (3) days to enter a region with Forest-terrain would have its speed coefficient of 150% reduce this time to only two (2) days.
- Detection vs. Land Units: This value represents the ability of an element to detect enemy land units. The higher the value, the better able an element is to detect an enemy land unit.
- Detection vs. Sea Units: This value represents the ability of an element to detect enemy naval units. The higher the value, the better able an element is to detect an enemy naval unit.
- Hide Value: This value represents the ability of an element to escape detection from enemy units. The higher the value, the better able an element is to escape detection.
- Weight: This number indicates the relative size of the element (in transport capacity) and is used when the element is transported by naval units.
- Support Unit: Yes or No. This entry indicates whether the element is a combat element or a support element.
- Police: This number represents the amount of ‘policing’ an element contributes to gaining military control over a region on the game map. It is expressed in Police points per day.
- Supply: These numbers represent the number of General Supply points currently stockpiled by the element/ maximum General Supply point capacity.
- Ammo: These numbers represent the number of Ammunition points currently stockpiled by the element/ maximum Ammunition point capacity.
- Patrol/Evade: The values represent the element’s ability to block enemy movement (i.e. Patrol value) out of a region and the element’s ability to ‘Evade’ or bypass enemy units (i.e. move through a region containing enemy units). The higher the value, the greater chance an element has of blocking enemy movement and evading enemy units.
- Blockade: The value represents a naval unit’s relative ability to institute a blockade of an enemy harbor (naval units only). The higher the value, the greater the unit’s contribution to the blockade calculation. (The collective blockade values of all friendly naval units in the sea zone are totaled in order to calculate the blockade’s effectiveness.)
The bottom pane displays an image representing the element’s principle asset-type (i.e. infantry, cavalry, artillery, naval vessel, etc.)
Leaders and Leadership
Leaders have an enormous impact on the effectiveness and efficiency of your military assets. Leaders are given leadership ratings that reflect their historical abilities and which affect almost every aspect of the game. Units that are ‘leader-less’ and/or Forces that exceed their Leader’s Command Point capacity are subject to movement and combat penalties.

Figure 6.1 shown here, 3-star leader Sir Isaac Brock (1812 Campaign), with special abilities
traits shown on the left of his ‘counter’
Leader Ranks (Command and Control)
The ability of Leaders to effectively command military assets is expressed as a comparison of their rank in relation to the number (and size) of the units under their command. Every Leader in the game is assigned a rank ranging from 1-star to 3-stars. (Naval Leaders are all referred to as Admirals regardless of rank.)
- 1-star General: Brigadier General
- 2-star General: Major General
- 3-star General: Viceroy, Marshall, Lieutenant General
Command Points
Each Leader provides Command Points (CPs) according to his rank. When multiple Leaders exist in a single Force the Command Points they provide are cumulative and applied to the Force as a whole.
Command Points Summary
- A 1-star Leader provides two (2) Command Points to units in his Force.
- A 2-star Leader provides four (4) Command Points to units in his Force.
- A 3 or 4-star Leader provides twelve (12) Command Points to units in his Force.
Command Cost
Each unit is given a Command Cost which reflects the difficulties a Leader would have in ‘leading’ it efficiently (large formations are unwieldy). Each Force has a Command Cost equal to the cumulative number of Command Costs associated with its component units.
Command Cost Summary
- Artillery battery: one (1) CP
- Regiment : one (1) CP
Increased Command Costs are used to represent cultural differences in command and control methodologies between nationalities.
Exceeding Command and Control
It is perfectly permissible for a Leader to be put in command of units that exceed his ability (i.e. Command Costs are greater than his Command Points). When this occurs, the Unit Panel displays a warning in the form of a percentage loss of movement and combat effectiveness. The penalty is equal to roughly 5% per CP over the Command Point allowance of the Force.

Command Point Modifications
The total number of Command Points that can be provided by Leaders in a single Force is effectively unlimited. This number can be modified by:
- + (Variable): Leader Special Abilities
Leader Attributes and Special Abilities
In addition to providing leadership in the form of Command Points, Leaders also have various individual attributes and Special Abilities that differentiate themselves from one another. To get the best use out of your leaders, be sure to always put the right man in the right job.
Leader Attributes
Each Leader has three (3) principal attributes: a Strategic Rating, an Offensive Rating, and a Defensive Rating.
- Strategic Rating: A Leader’s Strategic Rating is used to determine the likelihood that he will be considered ‘Active’ during a game turn. The higher his Strategic Rating, the more likely he will be ‘Activated’.
- Offensive Rating: A Leader’s Offensive Rating is used when a Leader is in command of a Force that engages in combat while assuming either an Assault or Offensive Posture.
- Defensive Rating: A Leader’s Defensive Rating is used when a Leader is in command of a Force that engages in combat while assuming either a Defensive or Passive Posture.
Leader Special Abilities
Some Leaders possess Special Abilities that give them advantages in certain circumstances. The Special Abilities that a Leader possesses are indicated by unique Special Ability icons which appear on his Leader counter. A complete list of these Special Abilities and their effects on game play is found in the Appendix section of this manual.
Leader Experience
Leaders gain experience from participating in combat. After each battle, Leaders are individually checked to see if they have gained or lost experience. This determination is based upon the Leader’s ratio of losses suffered/losses inflicted and has nothing to do with winning or losing the battle. It is quite possible for Leaders on the losing side to gain experience while leaders on the winning side may lose experience. Leaders that gain experience become eligible for eventual promotion if all other conditions are met.
Effects of Leader Experience
Leaders gain tangible benefits from their experience levels just as units do. (Consult Section Unit Experience for the effect of experience on combat units.) These benefits are accrued as follows:
- Strategic Ratings do not change because of experience.
- A Leader’s Offensive Rating is increased by +1 for each Even level of experience (2, 4, 6, etc.).
- A Leader’s Defensive Rating is increased by +1 for each Odd level of experience (1, 3, 5, etc.).
Promoting Leaders
Leaders who have proved themselves capable in their current rank may become eligible for promotion. This is indicated by a flashing promotion icon (a medal) on their counter and a message to that effect appearing in the Message Log turn summary. Promoting Leaders to the next rank enhances their ability to provide Command Points. There are several conditions that need to be met in order to promote a Leader:
An entry in the database must exist if the leader ratings or Abilities are to be changed upon promotion to the new rank. The Database can otherwise indicate "Auto-Promote" capability for a leader, where he will retain the same ratings and abilities. Consult the Unit Detail panel for the Leader to find out if the Leader is eligible. (Is Promotable Yes/No) Many leaders are not promotable.
The Leader must have either gained four (4) Seniority ranks or have a Seniority of 1 or 2. (The Leader’s initial Seniority ranking is shown in [brackets] on the Unit Detail panel. His current Seniority is listed along side his initial [bracketed] Seniority.
Note: Seniority is indicated numerically with the lowest numbers actually representing more senior Leaders.
In other words, a Leader becomes eligible when his current Seniority number is four (4) points lower than
his initial Seniority.
Orders
Game play in Wars in America is conducted simultaneously. Players plot their activities for the upcoming game turn (each turn represents one month of game time) by issuing ‘orders’ to the various military assets under their command. Once a player has finished issuing orders to his forces, the game turn is resolved by left-clicking the End Turn button on the Main Screen. Players are never required to issue orders. Forces without orders will simply maintain their previous turn Posture and act or react to the presence of enemy forces accordingly.
Activation
At the beginning of each turn, every Leader undergoes an ‘Activation Check’. (These checks are made even if the Leader is currently not commanding any units.) Activation checks are made using a Leader’s Strategic Rating. The higher a Leader’s Strategic Rating, the greater chance the Leader will pass the Activation Check. Leaders who pass their Activation Check are considered ‘Active’ for the upcoming game turn. Likewise, Leaders that fail their check are considered ‘Inactive’. Forces without Leaders are always considered Active but suffer movement and combat penalties accordingly.
Activation Check Modifiers
The Activation check is modified by the following conditions:
- +1 Strategic Rating: A Leader who was active during the previous game turn increases his Strategic Rating by one (1) for purposes of the Activation check.
Active Leaders
Leaders who are considered Active are indicated on the game map by having a white-colored envelope next to their TDM. Forces commanded by Active Leaders may move and engage in combat normally during the up-coming game turn.
Inactive Leaders
Leaders who are considered Inactive are indicated on the game map by having a brown-colored envelope next to their TDM. Units and Forces commanded by Inactive Leaders may still move and engage in combat during the up-coming game turn, but they do so with penalties applied.
Restrictions Placed on Inactive Leaders
Inactive Leaders may only assume a Defensive or Passive Posture (not applicable for Naval Leaders). In addition, the following restrictions are placed on Inactive Leaders:
- Inactive units or Forces suffer a 35% reduction in their movement ability (i.e. speed).
- Inactive units or Forces suffer up to a 35% reduction in their combat efficiency if they engage in combat in hostile territory.
- A user option creates a probability that an inactive leader and his stack can become 'locked' (i.e. inactive) for 1 or more turns.
Movement Orders
Forces are moved across the game map in an effort to achieve certain objectives and engage enemy forces in combat. Movement is always voluntary, and indeed, there are certain benefits derived from remaining stationary (such as regaining Cohesion Points and receiving replacements).
Speed of Movement
A Force moves at the speed of the slowest Unit in the Force. For example, a force that is predominately made of infantry moves at the artillery rate IF it contains an artillery battery.
Movement speed is based in part on the average Cohesion value of the elements in the Force in relation to the maximum average Cohesion of the elements in the Force. The resulting percentage is halved and then applied to the movement rate of the Force.
For example, if a Force has an average Cohesion value of 30 at the start of its movement and a maximum average Cohesion of 60; the difference is 50%. This 50% is then cut in half to 25%. Based on Cohesion alone, the moving Force in this example would move 25% slower than it would normally. Elements that have zero (0) cohesion points have a speed that is 50% of their normal movement rate.
Movement is also a function of many variable factors. These include the element’s Activation status, unit-type, speed coefficient, and Command Posture. Other factors include weather conditions, terrain, the presence of enemy forces, etc. Consult the Terrain Summary in Appendix A for a complete listing of all terrain-types and their effect on movement rates.
Cohesion Cost of Movement
Moving Forces spend their Cohesion points as follows:
- Normal Land Movement: Land Forces lose one (1) Cohesion Point for each day of normal land movement. This loss is modified by command posture and whether the Force is ‘Force Marching’.
- Naval Transport: Land Forces being transported by naval transport lose a minimal amount of cohesion; a Force will experience a greater loss of Cohesion when moving through sea zones with harsh weather.
- Naval Vessels: Naval vessels lose Cohesion depending on the type of ship and weather in the regions traveled through.
Forces also take Attrition hits in proportion to the Cohesion cost of the move.
Commander’s Note: It is good practice to assign a Command Posture (and ROE) to a Force before moving it.
Plotting Movement Orders
Movement orders are plotted on the game map (for both land and naval Forces) by left-clicking on a Force’s TDM and drag-drop(ping) the Force on its intended destination. Once the Force is dropped on its intended destination, a movement path linking the starting point and the destination is displayed. Each leg of the movement path (i.e. each region) is annotated with an indication of the estimated number of days the Force requires to travel that distance.
Editing Movement Orders
To cancel a movement order, drag-drop the Force back to its original starting location.
To cancel a movement order one leg at a time, press the Delete key once for each leg to be removed.
To add a leg to a movement path, left-click on the Force’s TDM (on the last leg of the movement path) and drag-drop the Force to the next intended destination. When a Force is moved into an adjacent region, the path-finding algorithm selects a movement path that is the quickest but not necessarily the most direct route.
To get the most direct route, hold down the CTRL key when drag-drop(ping) the selected Force.
Reliability of Movement Orders
A Force does not automatically follow orders if conditions change due to enemy interference. Remember; the simultaneous nature of the game turn means that enemy action must be accounted for.
For example, if a Force in an Offensive Posture is moving through a region and is engaged by a larger enemy Force, it is likely that the moving Force will seek to withdraw after a few rounds of combat (thus assuming a Passive Posture and coming to a halt).
Resting
A Land Force can recover Cohesion Points by spending time resting rather than moving and fighting. The basic rate of recovery for land units is 0.75 Cohesion Points per day of rest.
This basic rate of 0.75 Cohesion Points per day is modified by the following conditions:
- +1.00 CPs: Force is stationary in Passive Posture.
- +0.75 CPs: Force is stationary and inside a structure.
- +0.50 CPs: Force is stationary and outside of a structure.
- +0.50 CPs: Force is stationary and located in a loyal region.
- +0.50 CPs: Force is a stationary Irregular unit.
- −0.50 CPs: Force is in Offensive Posture.
- −0.50 CPs: Force is besieging.
- −0.50 CPs: Force is being transported by naval transport.
- −1.50 CPs: Force is besieged.
- Variable CPs: Cohesion Point gains/losses are modified by National Morale.
- Variable CPs: Certain Special Abilities increase/decrease the amount of CPs recovered.
- A Medical support unit in a Force increases the per turn Cohesion recovery by 15% (Note: There are currently no Medical Units in WIA, but it is possible to create a mod with Medical units)
Combat Orders
Players do not issue combat orders per se. Combat is executed automatically (under certain conditions) if opposing forces are present in the same region and at least one side is assuming an Assault or Offensive Posture.
Blocking Movement and Zone of Control
The simultaneous nature of Wars in America movement plotting and resolution segments means that players (and the computer AI) must anticipate their opponent’s activities. The presence of enemy forces and fortifications inhibits friendly movement in a land region during the resolution portion of a game turn. If the presence is strong enough, friendly units will be able to enter a region but move no further. Note that there is a minimum threshold required to block movement. (A weak enemy ZOC will not prevent friendly forces from entering a region where they have no Military Control.)
See Zone of Control for details.
Intercepting Enemy Forces
During movement plotting portion of a game turn (i.e. pre-resolution), rather than direct a friendly Force to move to a specific region, a player may direct a friendly Force to ‘intercept’ an enemy Force. If during the resolution portion of the game turn, the intercepting Friendly Force fails to locate the enemy Force, it will immediately stop moving. If a friendly Force attempts to intercept an enemy Force that subsequently splits into multiple Forces, the intercepting Force will attempt to engage the larger of the enemy Forces. An intercepting Force will have its movement path adjusted by the computer AI in order to intercept the moving enemy force.
To intercept an enemy Force, drag-drop the friendly intercepting Force (or Forces) on top of the enemy Force’s TDM on the game map. An icon indicating the Interception attempt is placed on the friendly Force’s TDM.
Raiding
A player who is able to disrupt the enemy’s supply network will severely cripple his opponent before the first shot is even fired. For this reason, it is important to take advantage of opportunities to strike at the enemy’s supply lines and infrastructure. Accordingly, players may set the desired behavior of their Forces using Special Orders as follows:
- Default Orders: Forces will automatically capture any supply stockpiles located in enemy structures that they capture while moving. The capturing Force first replenishes its own supply up to capacity, leaving the remaining supplies intact. Enemy structures remain intact and change ownership.
- Evade Fight: Forces will immediately destroy all enemy supplies they encounter while moving except in their final destination. Enemy structures remain intact and change ownership.
- Destroy Depot: To destroy a Depot, a Force must begin the turn in the region with the enemy Depot and be assigned the ‘Destroy Depot’ Special Order. The Depot is destroyed before the Force executes any additional movement orders. (Note: Only Level 1 depots can be destroyed).
- Pillage: Certain units (i.e. Indians, Guerillas, etc) immediately destroy all supplies and Depots they encounter. (They cannot destroy fortifications.) These units are identifiable by their ‘Pillage’ Special ability icons.
Entrenching
Entrenchments provide defensive benefits. They are not considered to be structures, although they do provide limited shelter against bad weather. They are not subject to the rules governing siege combat. Entrenchments are attacked using the Field Combat resolution procedure.
Entrenchments are eliminated once ALL units that occupy the entrenchment are moved out of the region. Friendly Forces within the same region may occupy different levels of entrenchments.
Players do not construct entrenchments. Forces under defensive posture do automatically entrench while idle, but the level of entrenchment is limited to 1, or a maximum of 2 with an Artillery Unit in the group. It is also possible to set a higher entrenchment value in the Scenario Setup, but this level is lost if the group moves.
Fixed Units
Many scenarios have Forces that begin the game as ‘Fixed’. Fixed Forces are indicated with a Lock icon next to their TDM on the game map or on the face of their unit counters on the Unit Panel. Fixed Forces may not move from their fixed location until:
- A friendly non-fixed Force ends its turn in the region (or structure) with the fixed Force (as per scenario restrictions),
- The fixed Force is attacked by enemy forces,
- A specific date has been reached (as per the tool-tip).
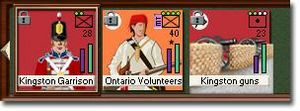
Figure 7.1 Fixed units. Shown here are two units garrisoning Kingston (Ontario, 1812 Campaign). The small
lock icon in the upper left corner of their unit counters indicates that these are ‘fixed units’.
Some Forces (such as automatic garrison elements) are permanently fixed and may never move under any circumstances. (A Static Element has a Move ratio of 0%). Consult the tool-tip information for information regarding specific units.
Special Orders
Special Orders allow players to fine tune how their forces move and react to the enemy during the upcoming turn. The Special Orders available to a particular Force are indicated on the panel with Special Orders buttons located to the left of the Unit Panel. Available Special Orders are highlighted—unavailable Special Orders are subdued. Leaders who are ‘Inactive’ may not perform certain Special Orders that would otherwise be available to them if they were Active.
Special Order Activity Checks
Unless otherwise noted, Special Orders require that the initiating Force pass an activity check (mostly related to Leaders and their attributes) in order to perform the desired Special Orders. Special Orders that require multiple days to complete are always executed at the beginning of a game turn. If time remains after completion of the Special Order, the Force will carry out any plotted movement.
The following Special Orders are available to land/ naval forces and may be initiated by using the Special Orders buttons if activated. A Special Orders button will only be Active if the pre-requisite conditions are met.
| Special Order Icon | Special Order | Special Order Description/ Effects |
|---|---|---|
| Ambush | Non-Moving Irregular Forces (i.e. Partisans, Guerillas, Etc) Can Try To Set Up An Ambush In Marsh, Forest, Hill, Mountainous And Swamp Terrain. If Successful, The Ambushing Units Receive Combat Benefits (Such As First Fire) And Have An Increased Chance To Withdraw. | |
| Forced March | A Force That Force Marches Is Able To Move Faster But At An Increased Loss Of Cohesion. Light Infantry And Cavalry Are Likely To Suffer Less Cohesion Loss THAN OTHERS. A Force Containing Only Leaders And/Or Support Units May Not Force March. | |
| Seek Shelter | A Force That Seeks Shelter Will Enter A Structure At Its Destination. A Force That Retreats In Battle Will Enter A Structure In The Current Region. | |
| Build Depot | The Force Expends Eight (8) Supply Family Elements (Supply Wagons or Naval Transport Units) with at least 50% health. This Constructs A Depot. Depot Construction Requires 30 Days to Complete. | |
| Destroy Depot | Force must begin the turn in the region with the enemy Depot and be assigned the ‘Destroy Depot’ Special Order. The Depot is destroyed before the Force executes any additional movement orders. (Note: Only Level 1 Depots can be destroyed). | |
| Evade Combat | A Force With This Order Will Seek To Avoid Contact With Enemy Forces During Its Movement. It Will Also Assume A Raiding Mode. | |
| Naval Bombard | A Naval Force Will Bombard The First Coastal Structure Or Entrenched Position It Encounters Provided A Friendly Land Force Is Present In The Region. Enemy Batteries In Fortifications Or Entrenchments Greater Than Level 4 Have An Opportunity To Return Fire. | |
| DISBAND UNITS / SPIKE THE GUNS | IF SELECTED, THE UNIT WILL BE DISBANDED DURING TURN EXECUTION. THE PLAYER WILL LOSE VP AND NM AS IF THE UNIT WERE DESTROYED IN COMBAT. The enemy is thus deprived of the opportunity to capture these units. | |
| DISTANT UNLOAD | Distant unload can be selected when land units are ABOARD a naval stack (i.e. embarked). select distant unload then select the land region for unload. Warning : you must move the naval stack to a coastal region adjacent to the “unload” land destination | |
| Destroy fort | WHEN SELECTED, THE LEVEL 1 FORT IN THE REGION WILL BE DESTROYED | |
| Build fort | WHEN SELECTED, A LEVEL 1 FORT WILL BE CONSTRUCTED IN THE REGION. | |
| SURRENDER | Besieged UNITs can surrender, CAUSING THEM TO disappear. |
Military Intelligence (Fog of War)
Wars in America recreates the uncertainty regarding enemy locations and intentions by presenting players with a condition known as the ‘Fog of War’. Essentially, the position of enemy forces is withheld unless players are able to ‘detect’ their presence. Keep in mind, however, that a player’s ability to detect an enemy is somewhat offset by the enemy’s ability to hide.
Detection Value
The ability of friendly Forces to see into a region they occupy (and adjacent regions) is determined by the number of Detection Points that a Force (or friendly region) is able to generate. Detection Points are not cumulative. Only the largest number of Detection Points generated by a single source is used. Once determined, this number of Detection Points is known as the Detection Value.
Detection Point Generation Summary
Detection Points (DPs) are generated by the following conditions:
- Highest Detection Rating of any friendly unit in the region. For example, an element belonging to a cavalry brigade usually has a Detection Rating of 4 DPs; a line infantry element usually has 2 DPs.
In regions in which a player does not have friendly forces:
- +2 DPs: Military Control in the region is at least 51% (friendly).
- +2 DPs: Population in the region is at least 51% Loyal.
- −1DP: Detection Points used to see into adjacent regions.
Detection Procedure
The Detection Value is applied to the enemy’s Hide Value. If the Detection Value exceeds the enemy’s Hide Value, enemy forces are detected (i.e. revealed on the game map). If not, the enemy forces remain concealed. For each point of Detection Value over an enemy’s Hide Value, the accuracy of the information received is increased.
Commander’s Note: Enemy forces near your territory or units are almost always detected unless the region is Wild
(i.e. no structures present in the region) or the enemy units are particularly stealthy. Irregular units are
good choices for both reconnaissance and infiltration.
Hide Value
The ability of friendly Forces to escape detection is determined by the number of Hide Points that a Force generates. Only the lowest number of Hide Points generated by a single source (unit in the force) is used. Once determined, this number of Hide Points is known as the Hide Value and is used in comparison with an enemy’s Detection Value to determine if a Force has been spotted.
Hide Point Generation Summary
Hide Points (HPs) are generated by the following conditions:
- If a Force is located within a region with a structure (either friendly or enemy), its Hide Value is automatically set to one (1) unless the Force is assuming a Passive Command Posture.
- +1 HP: Only Leaders are present in the Force.
- +1 HP: Force is Passive or considered Small.
- +1 HP: Covered Terrain (Forest, Woods, Wilderness, Mountain, Marsh, Swamps)
- +1 HP: Harsh Weather (i.e. Mud, Snow, Frozen, Blizzard)
- −1 HP: Force is considered Large.
Hide Points are cumulative. For example, a Small Force (+1 HP) containing only elements of Cossack cavalry (Irregular) has a base Hide Value of three (3); if located in a region with covered terrain (+1 HP) and harsh weather (+1 HP) it would have a modified Hide Value of six (6). A Force with a Hide Value of six (6) that remains in a Passive Command Posture is practically invisible—perfect for scouting behind enemy lines.
- Small Force: A Small Force is a Force that contains fewer than four (4) Units and/or fewer than four (4) Command Points worth of Units/Elements.
- Large Force: A Large Force is a Force that contains more than nine (9) Units and/or more than nine (9) Command Points worth of Units/Elements.
The naval aspect of Wars in America, while unlikely to be decisive in most scenarios, is nevertheless an important part of any overall strategic planning. Naval Forces are treated the same as Land Forces in most instances. Naval Leaders are referred to as ‘Admirals’ regardless of rank. There are no Chain of Command or Seniority issues to be concerned with. However, it is often a good idea to promote Admirals when possible to take advantage of the additional Command Points gained by virtue of the higher rank.
Naval movement orders are issued and plotted in the same manner as Land movement. Naval Forces are assigned Command Postures and ROEs that mirror those assigned to Land Forces. Movement is traced through adjacent sea zones (i.e. regions). Movement paths are indicated on the game map and annotated with the estimated number of days required to reach each sea zone.
Admirals are required to make Activation Checks each game turn. However, an Admiral who fails the Activation check is not prevented from assuming an Offensive Command Posture, only delayed in executing his movement orders.
Naval Forces can never be directly prevented from entering a sea zone (or river section). However, whenever a naval Force enters a sea zone (or river section) where an opposing naval Force is present, each naval unit uses its Patrol and Evasion Ratings to determine whether a naval engagement occurs. Coastal fortifications (and fortifications astride a navigable river) have high Patrol Values. In most cases this will enable them to fire on opposing naval forces as they pass by.
Naval vessels require General Supply and Ammunition to operate efficiently just as land units do.
Naval units may replenish their inherent supplies of General Supply and Ammunition supply points in friendly-controlled Ports which have a supply of General Supply and/or Ammunition points available. Naval units may replenish their inherent General Supply points while at sea if they occupy a sea zone adjacent to a land region with a supply of General Supply points available.
Naval Transport units may be used to transport and distribute supplies (both General Supply and Ammunition) to friendly land units and structures located in adjacent coastal regions. This method of distributing supplies is similar to that used by Supply Wagons.
Both sides may have naval vessels designated as transports. Naval transports are distinguished by their carrying capacity. For example, a large naval transport has the ability to transport (i.e. carry on-board) up to ten (10) points of transport weight. Transports rated as Tiny and even some Ships of the Line have the ability to transport one (1) point of transport weight.
There are two separate ways in which land units may board naval transports:
- Land units begin a game turn located inside a harbor with a Force containing naval transports. The land Force is combined with the transporting naval Force by drag-dropping the land Force on the naval Force’s tab (on the Unit Panel). The transporting naval Force must have sufficient transport capacity (i.e. transport points greater than or equal to the ‘weight’ of the land units). A movement order may now be issued to the transporting naval Force.
- Land units begin a game turn in a region adjacent to a coastal sea zone containing a naval Force with transport units. The land Force is combined with the naval Force by drag-dropping the land Force on the naval Force’s TDM. A movement order may be issued to the naval transport Force. This movement order will be delayed until the land Force boards the transports.
Land units may remain on-board transport vessels in sea zones indefinitely. However, land units will suffer attrition losses while at sea. Land units automatically disembark (i.e. leave the naval transports) when the transporting naval Force enters a harbor. They may also disembark in a region without a harbor (i.e. conduct an Amphibious Landing).
Distant Unload
Amphibious Landing Procedure
The Amphibious Landing procedure uses the Distant Unload special order:
- Select a naval stack containing embarked land units. Activate the Distant unload button and select the land region where the land units will be unloaded.
- Move the naval fForce to the a coastal region boarding the distant land destination. At the end of naval movement, the land forces will be unloaded in the adjacent land region.
Warning Note: all land units will be disembarked from the naval stack.
Naval combat is handled similarly to Land combat between opposing Forces in the same sea zone. At least one of the Forces must be assigned an Offensive Posture. Naval Forces engage in combat according to their assigned Command Postures and ROEs. Each engagement is conducted as a series of six (6) consecutive combat rounds per day. Combat continues until one side or the other decides to withdraw, is forced to withdraw, is destroyed, or night falls at the end of the sixth combat round. Combat resumes the following day with each side having to pass a Commitment Check. If neither side passes its Commitment Check, the battle is immediately ended and considered a Draw.
Wind Gauge Determination
The ‘Wind Gauge’ is a term used to describe the tactical advantage derived from having the wind blowing in a favorable direction. Since all fighting ships in this era were ‘sailed’ or oared, the speed and direction of the wind is an important consideration.
Wind Gauge is determined by comparing the Strategic Rating of the opposing Admirals (in command) along with the following conditional modifiers:
- Strategic Rating of Admiral in command (the default Strategic Rating is [3] if no Admiral is in command,
Combat bonuses due to Leader Special Ability (Admiral in command, bonuses can be positive or negative modifiers).
- The side with the highest modified Strategic Rating is considered to have gained the ‘Wind Gauge’. If both sides have an equal Strategic Rating after modifications, neither side is considered to have obtained the ‘Wind Gauge’.
Benefits of Having the Wind Gauge
The side that gains advantage of the Wind Gauge receives the following benefits:
- the Fire Value of combat vessels is increased by 15%,
- the chance of Boarding is increased to 50%,
- the Discipline Value of friendly vessels is raised for Boarding purposes.
Weather and Initial Firing Range at Sea
The initial range at which combat takes place is determined by identifying the element with the longest (i.e highest) Firing range. This initial range is modified by weather conditions (usually resulting in a reduction). The first round of combat takes place at this modified range.
This range is reduced by one (1) during each subsequent round of combat until the combat range reaches a minimum of one (1). Combat will continue to take place at a range of one (1) unless Boarding occurs.
In order for elements to fire during the course of a naval combat round, they must meet the following criteria:
- the element must be in range,
- the element must still have the ability to fire (i.e. not yet reached its maximum Rate of Fire for the round),
- the element must have at least 10% of its initial ammunition supply remaining.
If the element meets these criteria, it is allowed to fire (using either its Offensive Fire Value or Defensive Fire Value). Naval Fire combat is resolved by comparing an element’s Fire Value to the Protection Value of the defending units.
Boarding is essentially a naval version of melee combat. Unlike land combat, Boarding is not automatic. In fact, in any one naval engagement, there is only a 30% chance (per day) that Boarding will occur. If the side with the Wind Gauge has a greater average crew Discipline Rating than the opposing side, the chance of Boarding is increased to 50%. If the side with the Wind Gauge has a lower average crew Discipline Rating than the opposing side, the chance of Boarding is reduced to only 10%. Some Admirals (such as British admiral Sir George B. Rodney) have Special Abilities that either make Boarding automatic or modify the chance that Boarding will occur.
Once a Boarding action has occurred, neither side is able to fire (either offensively or defensively). Combat is instead resolved by comparing the attacking element’s Assault Value to the Assault Value of the defending units.
Note: Currently, players may not capture enemy ships in Boarding actions. Losses due to boarding are reflected as normal hits.
The Withdrawal procedure is calculated and executed in the same way as Land combat. A naval force that withdraws from combat (either voluntarily or otherwise) is moved to an adjacent sea zone or section of river. The winner of a naval combat is determined according to the losses suffered and losses inflicted on the enemy. Leader casualties are checked and indicated on the Message Log.
Naval vessels can recover Cohesion Points by spending time resting in a harbor rather than sailing and fighting. The basic rate of recovery for naval vessels is two (2.0) Cohesion Points per day of rest. Naval vessels that are at sea (i.e. not in a harbor) do not recover Cohesion regardless of whether they move or fight.
Commander’s Note: Damaged elements do not recover losses while at sea. It is a good practice to have damaged
vessels return to a friendly harbor.
Blockade
One of the more effective ways that seapower can influence a land campaign is through blockading enemy harbors. A blockade is nothing more than a cordon of naval combat vessels that seeks to prevent enemy ships from entering or leaving a particular harbor.
Each harbor has one or more exit points (sea zones). Each exit point must be occupied by naval units possessing the required number of Blockade points in order for the harbor to be considered ‘blockaded’. A harbor that is blockaded does not generate supply points.
The number of blockade elements required can be seen by "hovering" the mouse over the water region. The quantity displayed indicates the number of elements still required to blockade.
Supply
One of the most daunting challenges faced by any military leader is keeping an army supplied with all the goods and services it needs to maintain itself in the field. Forget about strategy for a moment—it’s logistics that wins most battles. Wars in America works with a supply system that very accurately recreates the problems faced by generals in this regard. Players that ignore the realities and limitations imposed by 18th and 19th century logistics soon find their forces rendered combat-ineffective or worse—simply melting away through attrition.
See Supply
Notes:
- You can check the total supply generated in each region by hovering the mouse over the region.
- Most supply is generated by friendly structures. Countryside supply is very limited and only used as a last resort, usually resulting in looting.
- The current supply reserve of each unit (before replenishment) can be seen in its tooltip.
- Each regiment carries reserves of food & water (usually 2 months worth for line units, 3 for irregulars and 4 for Indians) as well as ammunition for approximately 2 battles. These reserves are replenished every month if there is enough supply generated within range (own and adjacent regions).
Important: Besieged units (unless in an unblockaded port) only draw supply from supply wagons and depots inside
the besieged structure (in addition to burning up their remaining inherent reserves, if any).
Note: once moved away from their supply sources, units will gradually spend all their reserves and have to rely
on accompanying supply wagons to supply them if they want to avoid starvation and desertion.
Field Combat
Field combat is defined as two opposing forces engaging in ‘maneuver combat’ in the open. That is to say, neither side is defending or attacking a structure, as would be the case with Siege combat. Field combat can range from a mere skirmish involving only a few units to a major set-piece battle involving tens of thousands of soldiers and lasting several days.
Engaging in Field Combat
In order to engage in Field combat, two opposing forces must occupy the same region on the game map. At least one of the opposing forces must be assuming an Offensive posture to initiate the combat. Field combat is resolved in a series of six (6) consecutive one (1) hour combat rounds per day. If neither side withdraws (voluntarily or otherwise) the battle extends into a second day. It is conceivable (but unlikely) that a single battle could continue for dozens of combat rounds.
Combat Frontage
Depending upon the type of terrain in the region where field combat takes place, only a certain number of a unit’s component elements will actually take part in a battle during any single combat round. Elements that are unable to participate in a combat round are held in reserve and may be called upon to relieve other weakened elements in subsequent combat rounds.
See Frontage
Combat
Fire combat refers to the use of projectile weaponry to cause casualties among the enemy (i.e. rifles, muskets, artillery).
See Combat Explained
Commander’s Note: Victory in a battle is determined primarily by the losses suffered and losses inflicted.
It is possible to be considered the victor in a battle even if a Force withdraws if it inflicts serious
losses on an opposing force.
Siege Combat
Siege Combat is distinct from open field combat in that one side is defending a structure (city, fortification, or depot). There are two separate ways of resolving a siege open to an attacking force. An attacking force (i.e. the Besieging force) may choose to either: (1) ‘lay siege’ to the structure or (2) ‘Storm’ the structure.
Laying Siege
Laying siege to a structure can be a time-consuming process. It consists of a gradual wearing-down of the defender’s will to resist through attrition (i.e. starvation, disease, desertion, etc.). Combat is resolved by comparing the Siege Value of the besieging force to the Siege Value of the defending force (i.e. the besieged force).
Calculating the Attacking Force Siege Value
The attacking force is given a randomly generated Siege Value which is then modified by the following beneficial conditions:
- the amount of artillery strength points in the attacking force,
- attacking force commanded by a Leader with ‘Siege Engineer’ Special Ability,
- attacking force contains Sapper units (with ‘Siege Expert’ special abilities),
- presence of a ‘Breach’ in the structure’s defenses,
- the defending force lacks General Supply.
Calculating the Defending Force Siege Value
The defending force is given a randomly generated Siege Value which is then modified by the following beneficial conditions:
- the amount of artillery strength points in the defending force,
- defending force commanded by a Leader with ’Engineer’ or ‘Fort Defender’ Special Ability,
- the level of fortification.
Siege Resolution Value (SRV)
Once both siege values have been determined, they are compared. The difference between the two values is expressed as a single number referred to as the SRV (i.e. Siege Resolution Value.) For example, a besieging force with a Siege Value of six (6) is compared to a besieged force with a Siege Value of three (3). The resulting SRV would be three (3). If a besieging force with a Siege Value of four (4) is compared to a besieged force with a Siege Value of eight (8). The resulting SRV would be minus four (−4).
| SRV | Siege Resolution |
|---|---|
| Greater Than Defenders Average Unit Discipline | Defending force immediately surrenders (all units are eliminated). If the Defending force contains a Supply Wagon with General Supply points remaining, this result is ignored and a Breach is made instead (See below). |
| Greater Than or Equal To 3 | A Breach is made. Each breach reduces the fortification level of the structure by one (1). Reductions in fortification level affect the benefits of fortifications in future rounds of the current siege. |
| Greater Than 0 | The defending force suffers five (5) strength point hits per point of SRV. For example, an SRV of three (3) would result in the defending force losing 15 strength points. |
| Less Than 0 | The defending force manages to repair a previously-suffered breach. Increases in fortification level affect the benefits of fortifications in future rounds of the current siege. |
Note that results on this table are cumulative. A positive SRV greater than or equal to three (3) indicates that:
(1) a breach is made; and
(2) the defending force suffers hits accordingly.
Storming a Structure
If time is an important consideration, a structure may be attacked outright rather than wait for a lengthy siege to be resolved. A direct assault on a structure is known as ‘Storming’ a structure and it is resolved in much the same way as Field Combat except that a defending force derives great benefit from the structure’s fortifications.
Combat considerations involved in ‘Storming a Structure’ are:
- defending units receive combat bonuses due to the structure’s level of fortification (bonuses are reduced for cities without fortifications and depots)
- combat frontage (for both sides) is severely limited.
- defending units may not withdraw from combat
- a defending force that Routs as a result of combat is eliminated.
Battle Resolution
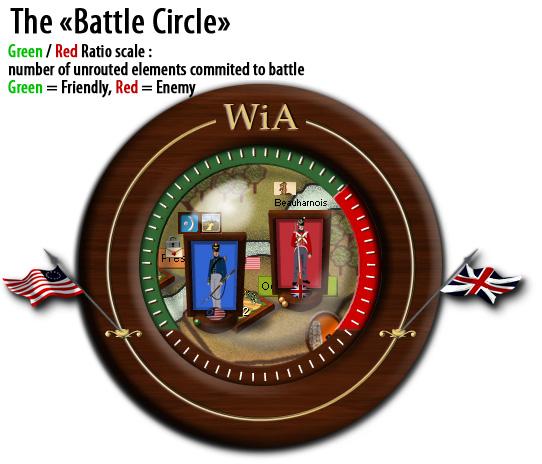
Once battle is joined, players exercise little direct control over their forces. Instead, each battle is fought according to a very complex series of AI routines.
Each battle is resolved individually and sequentially. The first battle to take place during the game turn is resolved first, followed by the remaining battles until all battles taking place during the turn are resolved. Each battle is reported back using two reporting schemes; the Battle Circle and Battle Report.
The Battle Circle is an animated display showing the location of the battle, the principal opposing commanders, flags representing the faction or nationalities involved, the number of Forces as they are committed to the battle, and finally, the ratio of un-routed elements committed to the battle on any given combat round.
While combat is being resolved, the Battle Circle gives you updates as additional Forces enter the battle and as the number of un-routed elements on both sides changes. Audio cues are also used to indicate various battle events (Committing the Guard, a cavalry charge, etc.).
Battle Report
Once the battle has been resolved, the Battle Circle is replaced by the Battle Report. The Battle Report is a static display that presents players with a very detailed summary of the battle that was just fought.
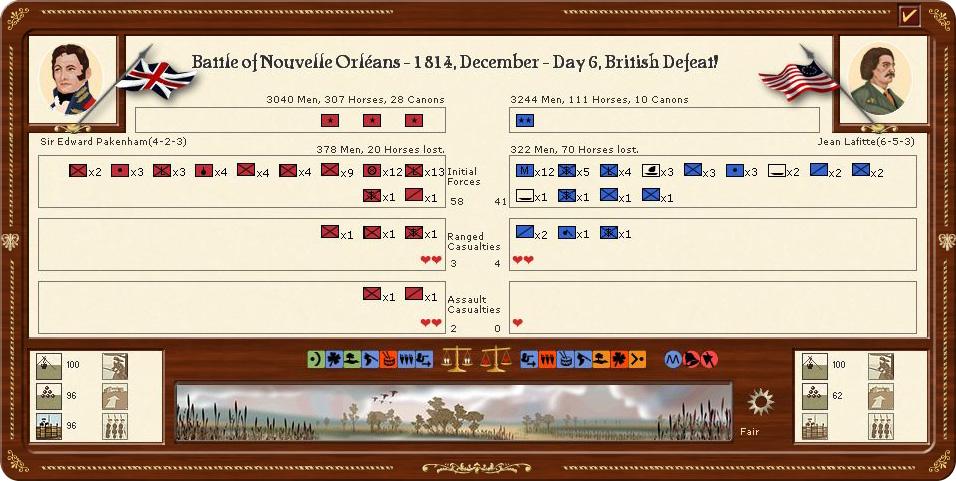
The Battle Report gives players detailed information as follows (from top to bottom):
- Battle Description: Each report has a heading that indicates the name (location) of the battle, the date of the current game turn, the exact day the battle took place, and—most importantly—who won.
- Leaders Present: The report lists each of the Leaders who were present at the battle. Use the tool-tip to find out their exact identities.
- Initial Forces: The report lists the number, type, and nationalities of all combat and support elements that participated in the battle.
- Ranged Casualties: Each red figure equals 10 hits suffered from Fire combat. The number indicates how many full elements were eliminated by Fire combat.
- Assault Casualties: Each red figure equals 10 hits suffered from Melee/Boarding combat. The number indicates how many full elements were eliminated by Melee/Boarding combat.
- Leader/Unit Abilities: Round icons indicate the Leader/Unit special abilities that were factored into the combat equation.
- Specific Action Indicators: Square icons indicate specific actions/events. Use the tool-tip to see specific actions/events that took place during the battle.
- Global Combat Values: The scales indicate the global combat values for both sides (accounting for all elements participating in the battle.)
- Total Casualties Suffered: The number indicates the exact number of men lost in the battle.
- Weather and Terrain panel: This panel displays a graphic representation of the predominant terrain. Underneath is a weather icon which indicates the weather at the time of the battle.
- Battle Summary Panels: These panels, located in the bottom corners of the report window, give specific information about the battle as it relates to each side (i.e. # of units Routing, # of men taken prisoner, etc.). Use the tool-tip to find out exact information contained in each icon.
The Battle Report gives a detailed summary about each battle. It is possible to determine what actually took place on the battlefield by studying the casualties, applied leader abilities, and specific action indicators.
Command Postures and Rules of Engagement
All Forces deployed on the game map assume a Command Posture which determines how they react to enemy activity each game turn. These Postures are selected by the player or assigned to a Force by default. As a reminder, a Posture icon appears on the game map to the left of each Force’s TDM. Rules of Engagement define the intentions of a Force if it participates in a battle. Taken together, these options allow players to exercise a high degree of control over their forces even after they have issued Orders for the game turn.
Command Postures
- See the article on Posture
Rules of Engagement (ROE)
The Rules of Engagement options available are different according to the Posture that has been assigned to a Force.
Assault and Offensive Posture ROEs
The possible ROE options for a Force in either an Assault or Offensive posture are:
| ROE Icon | ROE | ROE Description/ Effects |
|---|---|---|
| All-Out Attack | A Force will not attempt to retreat during the first two (2) combat rounds of a battle. The chances of attempting a retreat are reduced during subsequent combat rounds. Losses are increased for both sides. | |
| Sustained Attack | A Force conducts combat normally. This is the default ROE for Forces in Assault or Offensive posture. | |
| Conservative Attack | A Force attempts to withdraw from the battle beginning with the third combat round unless it appears as if victory is at hand. The chances of succeeding in withdrawing from battle are increased. Losses for both sides are reduced. | |
| Feint/Probe Attack | A Force attempts to withdraw from the battle beginning with the second combat round unless it appears as if victory is at hand. The chances of succeeding in withdrawing from battle are greatly increased. Losses for both sides are significantly reduced. |
Defensive and Passive ROEs
The possible ROE options for a Force in a Defensive posture are:
| ROE Icon | ROE | ROE Description/ Effects |
|---|---|---|
| Hold At All Costs | A Force will never attempt to retreat. Routing is still possible. Losses for a defending Force will be increased. | |
| Defend | A Force conducts combat normally. This is the default ROE for Forces in Defensive or Passive posture. | |
| Defend and Retreat | A Force attempts to withdraw from the battle beginning with the third combat round unless it appears as if victory is at hand. The chances of succeeding in withdrawing from battle are increased. Losses for both sides are reduced. | |
| Retreat if Engaged | A Force will attempt to withdraw beginning with the first combat round. The chances of succeeding in withdrawing from battle are increased. Losses for both sides are reduced. A ‘Retreat if Engaged’ ROE is automatically assigned to a Force adopting a Passive Posture. |
Force Postures and ROEs are assigned to Forces individually and independent of assignments made to other Forces. In other words, it is permissible (and indeed likely) that multiple friendly Forces located in the same region of the game map will have different Postures and ROEs. Such groupings of Forces treat the presence of enemy forces according to their individually assigned Postures and ROEs.
Attrition
The term ‘Attrition’ refers to a unit’s gradual loss of combat efficiency and manpower (i.e. disease, desertion, accidents, etc.). During the early America era, most armies suffered more from attrition than they did from combat with the enemy. This fact is reflected in the game by exposing Forces to potential attrition losses based on activities they perform throughout a game turn.
Effects of Attrition
Losses from attrition are reflected by the reduction of Cohesion and elimination of Strength Points.
Checking Attrition
Forces are checked for attrition under these conditions:
- Movement: A Force which moves during a game turn is subject to potential attrition losses in proportion to the Cohesion cost of the move. (Forces suffer one (1) Cohesion point loss for each day of movement subject to a number of modifiers.)
- Wilderness Region: A Force which occupies a Wilderness region for all or part of a game turn is subject to potentially severe attrition losses, more particularly during the bad season.
- Lack of General Supply: A Force which lacks General Supply (‘Out of Supply’) is subject to potential attrition losses each game turn.
- Harsh Weather: A Force which lacks shelter (i.e. in a region without a structure) during Harsh weather (i.e. Snow, Frozen, and Blizzard) is subject to potentially severe attrition losses.
- Epidemics: Large concentrations of strength points in a region have the potential of causing an outbreak of disease. If an epidemic breaks out, Forces are subject to potential attrition losses.
Attrition Reduction
The effects of Attrition are reduced by:
- Rich Region: Attrition losses are reduced by 50% if a Force is occupying a Rich region,
- Civilized Region: Attrition losses are reduced by 10% if a Force is occupying a Civilized region,
- Supply Wagons: A Supply Wagon (with General Supply) accompanying a land Force reduces attrition losses by 10%. Fleets are not protected by the presence of Naval Transports.
- Force is entrenched: A Force that is entrenched (regardless of level) reduces attrition losses by 20%.
Attrition modifiers (both positive and negative) are cumulative. For example, if an entrenched Force that lacks General Supply experiences an epidemic all three of these conditions would be factored into the final Attrition loss equation.
Hardened Attrition Option
Players may choose to play the game using the Hardened Attrition Option. This rule, while more realistic, will result in increased losses due to attrition as the name indicates:
- All units, regardless of whether they have moved during the current game turn, are subject to attrition under this option unless they occupy a structure (are inside the structure).
- Units will not be eligible to receive replacement strength points or elements unless they remain stationary and occupy a Depot.
Scorched Earth
‘Scorched Earth’ simulates the strategy of denying an advancing enemy the ability to live off the land (i.e. your land!) by deliberately destroying anything of value in a region before retreating.
Note: This strategy currently has very limited application in Wars in America., but is included for a
future 'what if' scenario.
Each scenario is different in the way it handles this aspect of play. Essentially, Scorched Earth has the following general effects:
- a % of supplies about to be captured by the enemy are destroyed before capture,
- a % chance that a region will be pillaged (destroying structures in the process),
- a % chance that a depot will be destroyed (along with any supply) rather than be captured,
- a general increase in attrition casualties if used in conjunction with the Hardened Attrition option.
Military Control
Military control of territory in Wars in America is handled more realistically than is the case with other simulations or war-games. No longer do players gain immediate control over an area just because they happen to have a few units pass through on their way to somewhere else.
Controlling Regions
Military Control over a region is expressed as a percentage of friendly/enemy control. A contested region is one in which control is split between the players with each player exercising a certain percentage of control. A player is said to exercise total control over a region when the percentage of friendly control reaches 100/0 (i.e. 100% control vs. 0% for the opposing player. A player can have anywhere from 51% to 100% and be considered to have military control over a region. (At 51%, however, a player’s military control can best be described as tenuous.) At the beginning of each scenario, the military control of regions on the map is indicated by icons representing the controlling side (FRA or GBR or satellite nations).
Gaining and Losing Military Control
Military control is gained by having friendly forces enter a region and remain for a period of time. The amount of time needed to gain complete control is dependent upon a number of factors. (Essentially, the larger the presence a player has in a region; the quicker the level of military control will reach 100.)
If opposing players each have forces in a region, neither will increase their level of military control until one or the other player assumes an Offensive Posture. If the player assuming an Offensive Posture is successful in driving the opposing force out of the region (or into a structure within the region), his level of military control will begin to increase. If only one player has forces in a region, his level of military control will begin to increase. On average, friendly forces will gain total control over a region in only a few turns. (Forces in Passive Posture do not increase or contest military control of a region.)
In American Revolution campaigns and scenarios (1775-1783), Military control is also affected by the level of civilian loyalty in a region. Military control is gradually increased over time if the citizens of a region are at least 51% loyal. Military control is gradually decreased over time if the citizens of a region are less than 51% loyal. Loyalty only affects military control in regions in which neither side has military forces (i.e. leaving a garrison in a region nullifies the effect of civilian loyalty).
Effects of Military Control
Having military control over regions has the following effects:
- Cohesion costs for movement are increased in enemy controlled regions
- an increased chance for successful ‘March to the Sound of the Guns’ checks
- an increased Detection Level
- an increased chance of blocking enemy movement through the region
Entering Hostile Territory
Hostile territory is defined as being a region in which a player has less than 6% military control. Entering such regions with friendly forces has the following effects:
- A Force that enters a hostile region automatically assumes an Offensive Posture. (Forces consisting solely of cavalry units, Irregulars, or support units ignore this rule when transiting hostile territory.)
- A Force that conducts an Amphibious Assault or river crossing into a regions with less than 10% control, automatically assumes an Offensive Posture. (Forces consisting of Irregulars or support units ignore this rule.)
- A Force cannot retreat from a battle into a region that is less than 6% controlled by the retreating player. (A player that loses a battle and is surrounded by hostile territory is likely to see the total destruction of his forces.)
Controlling Structures
In order to assume control over a structure (city, objective city, town, etc.) a side need only be the last to occupy it. It is not necessary to leave a garrison behind to maintain control although it is a good practice. Note however, that Victory Points are not gained from Objective/ Strategic cities in regions with less than 6% Loyalty (i.e. hostile territory) unless the cities are garrisoned.
Irregular units and Partisans may only take control of a structure if the Loyalty of the region is greater than 50%. Likewise, they cannot capture fortifications. (Irregulars and Partisans immediately destroy any Depots they enter including any supplies stockpiled inside).
Civilian Loyalty
Loyalty is a measure of the civilian population’s support for a player’s side and is independent from the level of military control. (It is quite possible to have a high degree of military control over a region and yet a very low level of civilian support.) Winning the ‘hearts and minds’ of civilians in regions you control is a lengthy process.
Important Note: currently, the 'Loyalty property' is only used in the American Revolution scenarios (1775-1783).
Effects of Civilian Loyalty
A region is considered Loyal if a player has at least a 51% Loyalty. (Granted, a Loyalty percentage of only 51% is a slim margin.) A player gains the following benefits from having a loyal region:
- garrisons in Objectives are not required in order to earn Victory Points,
- an Increased Detection value in the region,
- an increased chance of friendly Partisan units appearing if enemy forces take Military Control,
- a gradual increase of the Military Control percentage.
Open Revolts
If a player exercises Military Control over a region that is less than 11% Loyal and fails to garrison its cities and towns, an Open Revolt is very likely to occur. If an Open Revolt occurs, enemy partisans units appear in all un-garrisoned structures.
Influencing Loyalty
Loyalty is influenced by capturing Strategic Cities. Each time a player captures an enemy Strategic City, one (1) Loyalty Check is made in the following locations:
- each Strategic City on the map,
- each region with a Strategic City in the Area,
- each region adjacent to the newly captured Strategic City (This also includes the region with the newly captured Strategic City.)
These checks are cumulative. For example, a region with a Strategic City that is captured by the enemy would be checked three (3) times—once for each of the Loyalty Check conditions mentioned above.
Partisans
Partisans are civilians who have taken up arms to drive out an enemy’s military control and/or presence in a region. They appear primarily in areas and regions where they were historically active. Partisans may appear automatically according to the scenario being played or appear when a region experiences an Open Revolt. Partisan units are typically used to disrupt supply transport. They are fast and difficult to locate but stand little chance in combat against organized troops.
Engagement Points
Engagement Points (EP) are the currency used for Military and Diplomatic Optons. They are earned in several ways:
- Capturing of Objectives and Strategic Cities
- Maintaining Merchant vessels in the Ocean Commerce areas
- by event
Note: EP's are earned every turn, and are accumulated until 'spent' on Options. Merchant vessels and events
produce messages telling you EP gain or loss, if any. Strategic cities give you 0.25 EP a turn, objectives
produce from 0.1 to 0.3 each turn. You can a list of all those sources in the Objective Page of the ledger.
The Ledger (Managing Your Forces)
Wars in America is a complex simulation involving a myriad of command decisions each turn. To assist players in managing their forces, a Ledger feature has been included which places a wealth of critical information into an easily accessible format.
To open the Ledger, left-click on the Globe located to the left of the Unit Panel on the Main screen. You may also open a specific page on the Ledger by pressing any of the function keys (F1 through F5) as indicated below.
The Forces List (F1 key)
The Forces List is a roster of all Leaders, garrisons and maneuver forces available in a given scenario.
Sorting the Forces List
The Forces List can be sorted so that specific information is readily displayed. Use your mouse to select the feature you are interested in viewing (i.e. unit strength, cohesion, unit name, region, etc.) Use the mouse wheel to scroll through the Forces List.
Forces List Filters
Located to the left of the Forces List is a column of filters that can be toggled On and Off to further refine your display of specific information. (You can identify the filters by holding your mouse over the filter icons.) For example, if you were interested in finding out the strength of cavalry stacks in a particular area, you would simply sort the Forces List by Area (or Theater) and toggle the cavalry filter to ON.
Jump to Unit Feature
The Forces List allows you to select and jump to any unit on the game map by clicking on the icon in the right corner of the unit’s information box.
Second Level Filter (Units Listing)
Pressing F1 a second time will activate another set of filters for the units’ ledger, showing all your units individually.
Available Replacements Screen (F2 key)
The Available Replacements Screen contains a graphic summary of all available replacement chits according to their specific sub-types and nationality.
Military Options Screen (F3 key)
The Military Options Screen contains a description of all Military Options open to a player along with the cost of these options (in terms of Engagement Points). These options will vary according to the scenario being played. Not all scenarios contain selectable Military Options.
The Message Log indicates when Military Options are (or become) available. Players take advantage of these options by left-clicking the option text on the Ledger screen. A signature appears next to the option to indicate that it has been selected. Certain options may be selected multiple times (as long as the player can afford the associated costs).
Diplomatic Options Screen (F4 key)
The Various Options Screen contains a description of all scenario options open to a player along with the cost of these options (in terms of Victory Points). These options will vary according to the scenario being played. Not all scenarios contain selectable Options.
Victory Points and Objectives Screen (F5 key)
The Victory Points and Objectives Screen contains:
- a summary of National Morale totals and Sudden Death status,
- location of your Objective Cities, with the name of the city, the current ownership, the value of the city in NMs, and the location (Theater) of the city. (Clicking on the ownership icon closes the ledger and takes you to the city on the game map.)
- your Victory Point totals (enemy totals in brackets),
- your total combat losses (enemy totals in brackets),
- Victory Points received each turn for owning Strategic/Objective cities (enemy totals in brackets),
- Scenario end date, current turn number and number of game turns remaining in scenario.
Scenario Stratigic towns are listed on the second page of this screen. The list displays the name of the city, the current ownership, the value of the city in NMs, and the location (Theater) of the city. (Clicking on the ownership icon closes the ledger and takes you to the city on the game map.)
Historical Background Screen (F6 key)
This screen contains a brief historical description of the scenario that may assist you in developing strategies of your own.
Weather and Seasonal Effects
As the European Armies discovered in the 1700's, weather can be a general’s best friend or his worst nightmare. Weather effects are applied on a regional basis. For example, the weather conditions present in one region can be considerably different than weather occurring in an adjacent region. Weather generation does take into account seasonal variations in temperature and wind patterns. Therefore, the likelihood of harsh weather occurring in a region is greater during winter months (November through February).
Notes:
1. Forces in a loyal region (over 50% Loyalty) with a friendly structure ignore Attrition losses due to Harsh Weather.
   The Force does not have to be physically placed inside the structure to benefit.
2. The attrition effects of Snow, Frozen, and Blizzard conditions involve increasing amounts of severity (with
   attrition due to Blizzard being the most severe).
| Weather Type | Effect on Movement/Supply | Combat Effects (Atk/Def) | Attrition | Notes |
|---|---|---|---|---|
| None | None | None | ||
| Moderate Penalty, Crossing rivers more difficult | Slight Penalty (Atk) | Mountain regions suffer Attrition | See Note 1 | |
| Moderate Penalty | Moderate Penalty (Atk), Battles start at Close Range | Attrition unless Sheltered | See Note 1 | |
| Moderate Penalty, Bodies of water may freeze | Moderate Penalty (Atk) | Attrition with increased severity unless Sheltered | See Note 1 | |
| Severe Penalty, Bodies of water may freeze | Severe Penalty (Atk), Battles start at Close Range | Attrition with even greater severity unless Sheltered | See Note 2 |
Losses and Replacements
When combat and attrition losses occur, they are apportioned among elements belonging to the Force which has suffered the casualties. These elements have their losses indicated on the Unit Panel by the presence of gray manpower symbols (black manpower symbols representing remaining strength points). Each hit suffered causes the loss of one (1) strength point. The exact total of men remaining in the element is indicated numerically. As long as elements have at least one (1) Strength Point remaining, they are eligible to receive replacements. Once the final strength point is lost, the element is eliminated.
The Replacement Pool
The number, type, and nationality of available replacements are displayed on the Replacements Screen (F2 key) of the Ledger. This pool of replacements represents manpower which is being trained and held in reserve until such time as it can be forwarded on to eligible combat units. Replacements are represented on the Replacement Screen in terms of replacement chits. Each replacement chit is equivalent in strength to an average company-sized element of the nationality indicated.
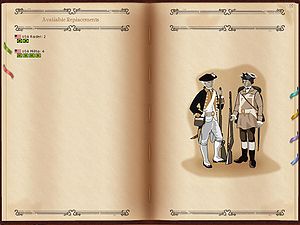
Replacement Chits
There are events during the game that generate additional replacement. Otherwise, the player must expend EP in Military and Diplomatic Options to 'purchase' additional replacements.
Absorbing Replacements
Replacement chits are used to create entire elements that can be merged into units that have lost an entire element.
In WIA, replacement chits are NOT required for a unit to regain strength of damaged elements.
Eligibility, Prohibitions, Priority to Receive Replacements
See Replacements
Automatic Garrisons
Note: Prior to patch 1.08, WIA uses the "Simple" Auto-Garrison system.  Only a select few scenarios are
      programmed to use the feature.
      Beginning with patch 1.08, the Advanced Auto-Garrison system is implemented, albeit in only a few scenarios.
Capturing Enemy Units
At the conclusion of every battle or siege combat in which the losing side is Routed or Surrenders, the winning side has the opportunity to capture enemy artillery and supply units. Essentially, Routed units that are fired upon by enemy elements are susceptible to being captured. This represents the destruction of an organized line of resistance and the vulnerability of rear echelon formations to being overwhelmed by an advancing enemy.
Capturing Enemy Units after Field Combat
At the conclusion of a Field Combat in which the losing side has Routed, support units which survived the combat are susceptible to capture. Each artillery battery and supply wagon belonging to the losing side is checked to see if it is captured. Captured units are immediately placed into a single TDM controlled by the winning side. Such units are identified as ‘Captured’ by the gray background and word ‘Capt’ printed on the unit counter face.
Capturing Enemy Units after Siege Combat
At the conclusion of a Siege Combat in which the losing side has Routed, support units which survived the combat are susceptible to capture. Each artillery battery and supply wagon belonging to the losing side is checked to see if it is captured. Captured units are immediately placed into a single TDM controlled by the winning side. Such units are identified as ‘Captured’ by the gray background and word ‘Capt’ printed on the unit counter face. Fixed artillery (such as emplaced or coastal batteries) are automatically Captured.
Using Captured Units
Captured artillery and supply wagons function exactly as normal units in every respect. However, captured units may not recover losses unless they are replacement points available of the same nationality. In most cases, this will not occur unless a player is able to re-capture a previously-captured unit.
Unit Experience
One of the most telling factors in any combat situation will be the experience (or lack thereof) of the participants. Many elite units were effective not because of their pretty uniforms, but because the men in these units had years of experience in dealing with the stresses of campaigning. (Consult Section 6.2 for information regarding the effect of experience on Leaders.)
Experience Levels
There are multiple levels of experience indicated by small stars on the unit icon. Units and Leaders may lose experience when trained (upgraded) to a new unit type. There is no upper limit to the number of experience levels a unit may gain during play.
Experience Indicators
A Unit’s level of experience is indicated by the number of stars on it's unit counter.
Experience is also indicated by star icons located on the top pane of an element’s Unit Detail panel display. Each star represents a level of experience. For example, certain veteran units begin scenarios with up to five (5) levels of experience. These units have five (5) stars in their Unit Detail panel displays.
Gaining Experience
Experience is gained by participating in combat or through training provided by Leaders with Training-related Special Abilities. When a unit participates in combat, depending upon its individual success, it may be awarded Experience Points. Experience awards are noted in the Message Log. In order to gain an Experience Level, a unit must acquire anywhere from 5 to 20 Experience Points. Eligible units are checked at the end of each game turn to see if they have gained an experience level.
Effects of Experience
The net effect of experience is to make units more efficient military formations. For each level of experience, units have their abilities increased as follows:
- For each Odd level of experience (i.e. 1, 3, 5, etc.), units gain a +1 increase in their Initiative, Discipline, Patrol, and Evasion values.
- For every Even level of experience (i.e. 2, 4, 6, etc.), units gain a +1 increase in their Offensive Fire, Defensive Fire, Assault, and Police values.
- For every level of experience, units gain a 10 point increase in their Cohesion value. (For example, a unit with two levels of experience receives 20 extra Cohesion points.)
Scenario Events
Each scenario contains scripted ‘events’ designed to introduce historical perspective and happenstance into the game. Events can be triggered by players who fulfill certain conditions or triggered simply by reaching a particular date in the scenario. Most events are noted in the Message Log. Some even come with their own ‘press releases’.
In many cases, the occurrence of an event is merely for information purposes. Some events, however, insert or delete troops from the game map. Pay close attention to the Message Log at the beginning of each turn and use the ‘jump’ feature (left-clicking on message text) to go directly to the map where an event has taken place.
Appendices
A. Terrain Summary for Land Units
| Terrain Type | Effect on Movement/Supply | Combat Effects (Atk/Def) | Attrition | Notes |
|---|---|---|---|---|
| Roads | Treat as clear terrain regardless of actual terrain | |||
| Major Roads | Cost of moving is 50% of the cost of clear terrain | |||
| Clear | Foraging Bonus | |||
| Woods | Slight Penalty | Atk: None Def: Slight Bonus | ||
| Forest | Moderate Penalty | Atk: None Def: Moderate Bonus | ||
| Marshes | Severe Penalty | Atk: None Def: Moderate Bonus | Hide Bonus | See Note 2 |
| Wilderness | Severe Penalty | Atk: Severe Penalty Def: None | Hide Bonus | See Note 3 |
| Mountain | Severe Penalty | Atk: Severe Penalty Def: None | Hide Bonus Limited Foraging | See Note 4 |
| Major River | Severe Penalty | Atk: None Def: Major Bonus | May freeze during Winter | See Note 5 |
| Minor River | Moderate Penalty | Atk: None Def: Minor Bonus | See Note 5 | |
| Ferry/Bridge | Moderate Penalty | Atk: None Def: Minor Bonus | Negated if Frozen | See Note 5 |
| Shallow Water | Moderate Penalty | May freeze during Winter | ||
| Coastal Water/ Great Lakes | Impassable | |||
| Ocean | Impassable | |||
| Transit Link | Travel To and From requires up to 1 full Turn or longer |
Notes:
- Irregular units receive Major Combat bonus (Atk & Def)
- Irregular units receive Slight Combat bonus (Atk), receive Major Combat Bonus when Ambushing
- Irregular units receive Moderate Combat bonus (Atk) when Ambushing
- Irregular units receive Moderate Combat bonus (Atk) when Ambushing, increased movement penalties for wheeled and mounted units.
- Friendly Forces attacking across a river (major or minor) do not incur a penalty if the region has a level of friendly military control greater than 10%
| Terrain Type | Effect on Movement/Supply | Combat Effects (Atk/Def) | Attrition | Notes |
|---|---|---|---|---|
| Major River | Shallow draught vessels only | Weather may reduce initial combat range | May Freeze | |
| Minor River | Prohibited to naval units | |||
| Shallow Water | Shallow draught vessels only | Weather may reduce initial combat range | May Freeze | |
| Coastal Water/ Great Lakes | Weather may reduce initial combat range | May Freeze | ||
| Ocean | Prohibited to Shallow draught vessels | Weather may reduce initial combat range | May Freeze | |
| Transit Link | Travel To and From requires up to 1 full Turn or longer |
C. Shortcut Keys
| Mouse Action or Key | Result |
|---|---|
| Mouse wheel | Zoom in/Zoom out |
| Click on mouse wheel | Alternate between maximum and minimum zoom levels |
| [Page Up] | Zoom in |
| [Page Down] | Zoom out |
| Mouse Action or Key | Result |
|---|---|
| Left-click | Select a Force. |
| Right-click | Unselect (and returns to messages display) |
| [Ctrl] left-click | Cycle through the various region Forces, make multiple selections on the Unit Panel |
| Drag-drop on another region | Moves Force to desired location. |
| Drag-drop on same region | Cancel whole move (exception: if [Shift] is pressed it allows circular trips) |
| Drag-drop on another Force | Either intercept an enemy or combine with a friendly Force |
| Drag-drop on city, harbor | Enter the structure |
| Drag-drop on a tab | Combine with this Force |
| [Ctrl] Drag-drop | Moves Force to desired location (Disables pathfinding) |
| [Del] | Cancel the last leg of the movement path of an Army or Fleet |
| [C] | Center map on selected Force |
| [Shift] | When a Force is selected: Displays regions and nature of the links. |
| [Ctrl] | Show number of men |
| Mouse Action or Key | Result |
|---|---|
| [Q]/[W] | Cylce through 'locked' land forces. |
| [E]/[R] | Cycle through land Forces. Simultaneously press [Ctrl] to skip units that are not moving. |
| [T]/[Y] | Cycle through naval Forces. Simultaneously press [Ctrl] to skip units that are not moving. |
| [S] | (Sentry) Selected Force will be skipped when cycling with keys E/R/T/Y (hit again [S] or [SPACE] to remove the sentry state) |
| [Ctrl] [S] | Remove all “sentry” orders |
| [Space] | Selected Unit will be in "Sentry" mode for one turn |
| [Ctrl] [Space] | Selected Force will be in Sentry mode until 90% healthy |
| [Ctrl] [L] | Lock/unlock all Forces (prevents a Force dropped onto another Force from merging) |
| Right-click on a tab | Lock/unlock this Force to allow merging. |
| Keys [1] – [6] | Switch Map Filter |
| [Ctrl] [F1]-[F4] | Use unit filter for you or your enemy. |
| [Ctrl] [F9] | End Game Turn |
| [Ctrl] [Shift] [S] | Save Game |
| [Ctrl] [F] | Search for a Region by name |
| Mouse Action or Key | Result |
|---|---|
| [F1] | Force List |
| [F1] then again [F1] | Units List |
| [F2] | Replacements |
| [F3] | Military Options |
| [F4] | Diplomatic Options |
| [F5] | Objectives |
| [F6] | Scenario Background |
| Mouse Action or Key | Result |
|---|---|
| [Ctrl]-click | Select/unselect multiple units |
| Mouse wheel scroll | Move through the list of units |
| Select unit(s) then drag-drop | Create a new Army/Fleet. This is used for disembarking in a coastal region without a friendly harbor. |
| [A], [O], [D], [P] | Change the Force to the corresponding posture |
| [Alt] +Left Click | Rename selected Force |
| Mouse Action or Key | Result |
|---|---|
| [Shift] [T] | Enter Town upon reaching destination |
| [Shift] [D] | Build Depot |
| [Shift] [S] | Sortie from structure |
| [Shift] [M] | Force March |
| [Shift] [A] | Set an Ambush |
| [Shift] [B] | Burn Structure (land units) |
| Mouse Action or Key | Result |
|---|---|
| Simple-click | Go to region where event occurred (if relevant) |
| Double-click | Display messages content (if message is red) and opens specific message window |
| Mouse wheel scroll | To scroll up and down the message list |
| Mouse Action or Key | Result |
|---|---|
| [Esc] | Close the window |
| [R] | When on the main menu: Resume last played game. |
| Saved Games | When you move the mouse over a saved game on the load game screen, you can either back up one turn ([Home] key), rename it ([Insert] key) or delete it ([Delete] key). |
D. Map Icons
E. NATO Symbols
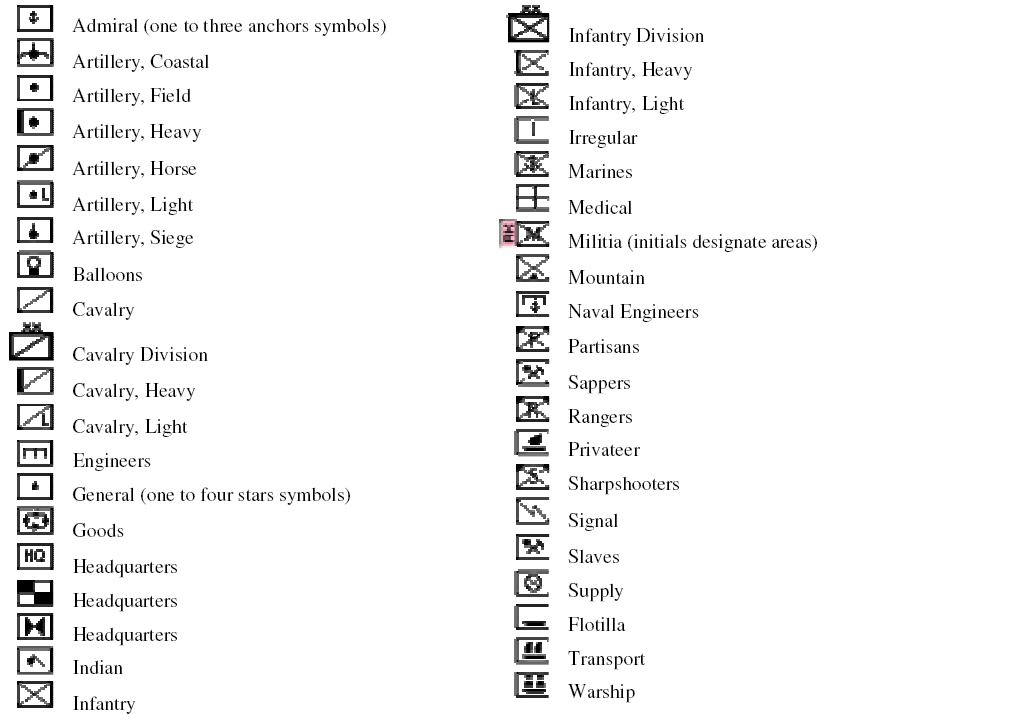
F. Leader Special Abilities (Traits)
F1. Special Abilities Applicable Only to Element or Leader
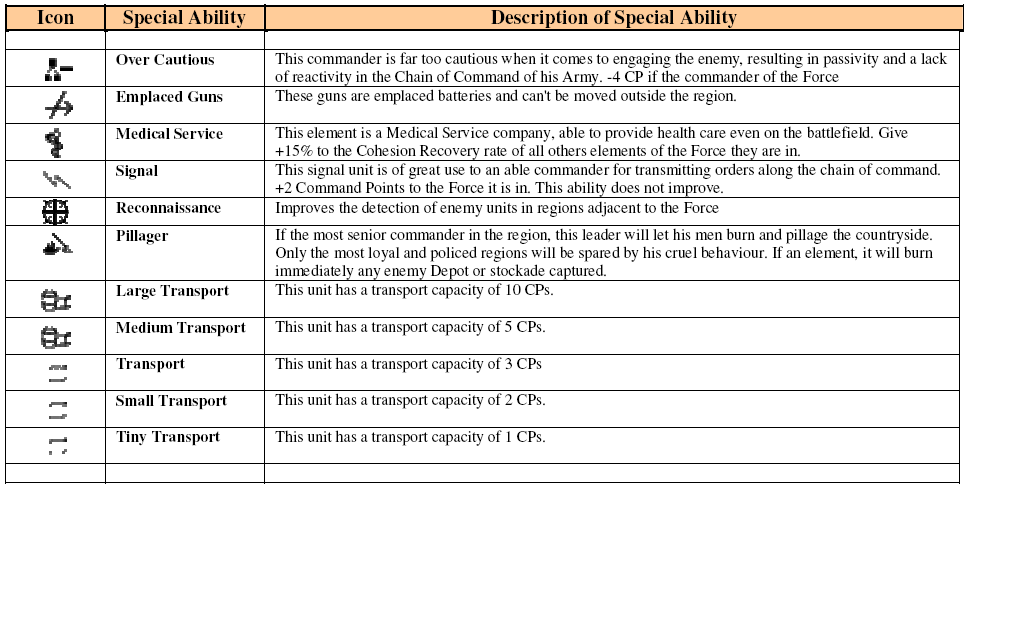
F2. Special Abilities Applicable Only to the Unit to which an Element Belongs

F3. Special Abilities Applicable to an Entire Force
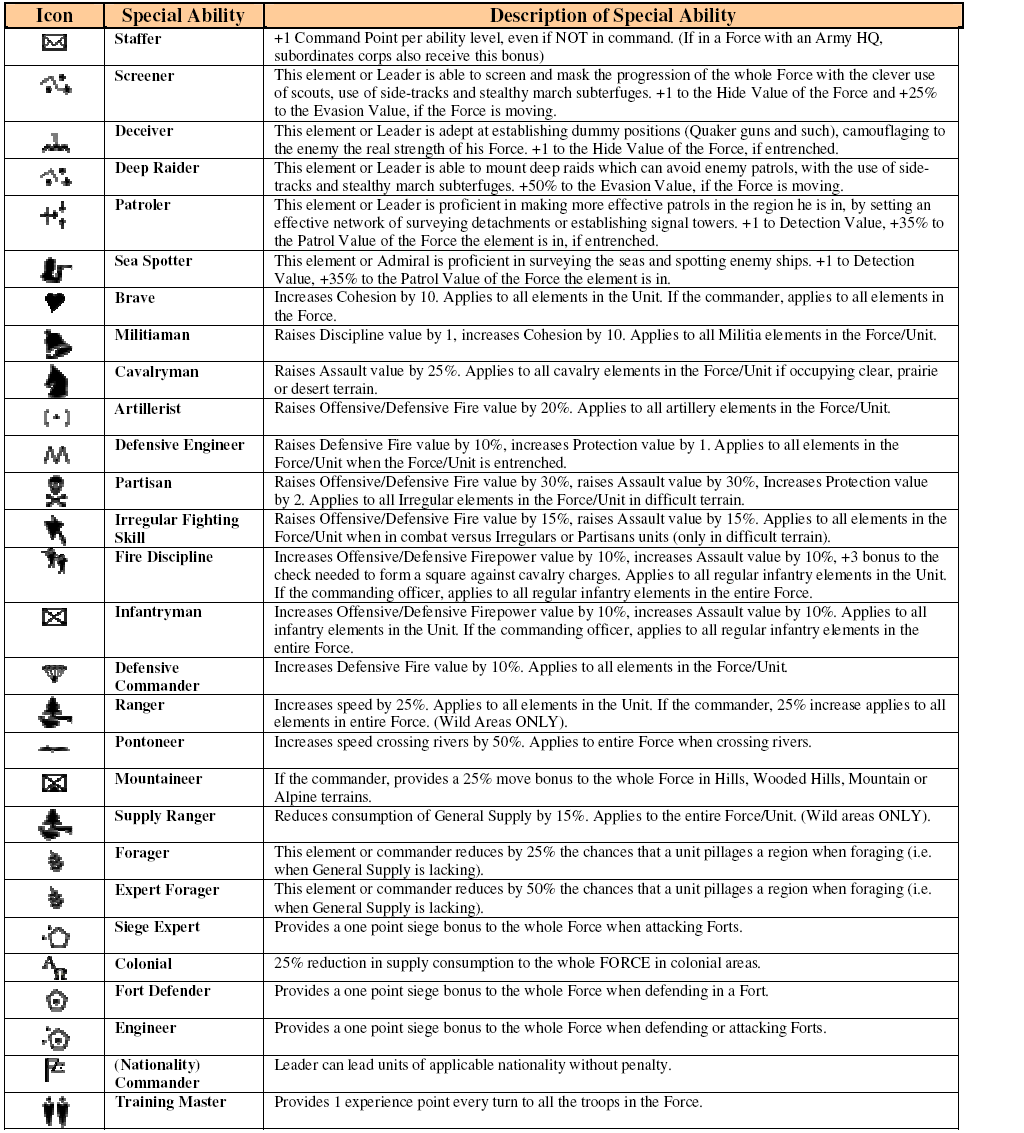
F4. Special Abilities Applicable to an Entire Force only When Leader with Special Ability is in Command
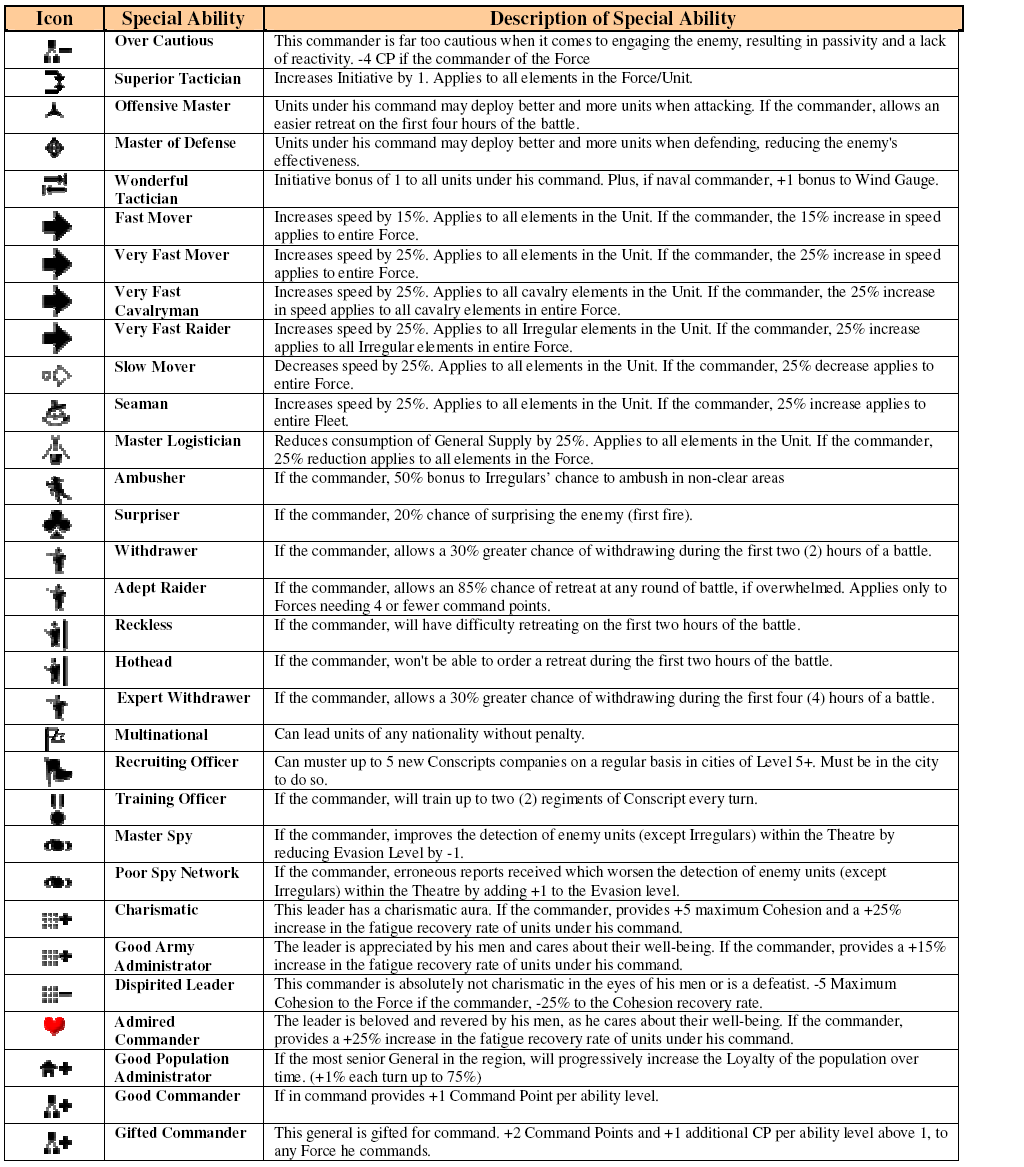
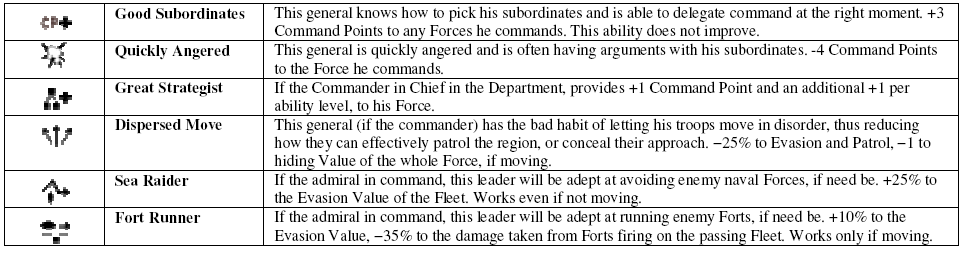
Note:  With patch 1.07a or later, the Training Officer abilty now applies to a Group even if the leader
with the ability is NOT in Command.
H. Manual Errata and Additions
This section will contain changes or additions to information as a result of future updates to the software. Information contained in this manual is current up to version 1.01.
Building a Depot or Fort in a contested region
In addition to the requirement for the correct units being healthy, in-supply and a required level of Military Control, the region cannot be 'contested' by the presence of an enemy combat force.
Note that some raiders and Natives may be stealthy and in the region without being spotted, and so will prevent construction for no obvious reason.
J. Credits
Athena Games Entertainment Online Distribution (AGEOD)
- Game Designers: Philippe Thibaut & Philippe Malacher
- Development: Philippe Malacher & Yoann Brosseau
- Art Director: Original Art by Robin Pirez. Complementary art by Gilles Pfeiffer
- Graphics: Original Art by Robin Pirez. Complementary art by Gilles Pfeiffer
- Historical Research: Philippe Thibaut, Florent Quesnel, Steve Dunn
- Additional Research: Philippe Sacré, Olivier Malacher, Ludovic Grousset
- Music: Grégory Minodier, US Army's 3rd US Infantry Regiment Fife and Drum Corps:
- Sounds SFX: Michael Huang
- Documentation: Orignal documentation by Laurence Russell
- Proofreading: Paul Roberts, Steve Dunn, Mark Kratzer
- Corporate Communications: Ludovic Grousset, Mark Kratzer
- Administration: Philippe Thibaut, Samuel Anzalone
Special Thanks:
- Deputy Director of Public Affairs Adrienne M. Combs, Joint Force Headquarters, US Military
- Master Sergeant Kanessa Trent, Public Affairs Office, US Army
- Major Joel Lindeman, 3rd US Infantry Regiment, US Army
- Steve Dunn
- Paul Roberts
- Norbert Hofmann
- Arturo Sanchez
- Stefan “aka” Dooya
- Arne Meyer Vedo-Hansen
Volunteers (Alphabetically):
- Arsan, Cat_Lord, Dooya, Lightsfantastic, Lodilefty, Moustic, Muddymonkey77, Primasprit, Rafiki, Reiryc, Runyan99, Stwa, Sunray, Tagwyn, Tarakoja, Teufel0331, TheDeadeye
Production: A game produced by AGE Studio